标题: 基于FPGA的LCD1602原理综述 [打印本页]
作者: mcmc1 时间: 2018-5-6 19:53
标题: 基于FPGA的LCD1602原理综述
LCD1602的简单使用原理——跟大家分享我学习1602的总结与体会
我的总结主要分为这几部分:
①LCD1602的硬件特性及引脚功能
②LCD1602的时序特性
③LCD1602的使用原理(包括带字库和不带字库的简要使用方法,控制显示指令)
④基于FPGA的LCD1602使用案例
Part 1. LCD1602的硬件特性及引脚功能
LCD1602顾名思义是一种02*16,即为两行十六列的液晶显示屏,液晶两行,每行可以显示16个字符,但是CGRAM及CGROM里面一共有160个字符,包括阿拉伯数字,英文字母大小写,常用符号及日文。每个字符对应于一个ASCII码值,在液晶显示屏上显示对应的字符时候,只需要将对应的ASCII码写到DDRAM中就好,详细的步骤会在下面细说。液晶板上排列着5*8的字符点阵,8行,每行5个点位,高电平1就是该点显示,低电平0就是该点不显示。
RS,R/W,E控制数据端口DB0~DB7,数据的命令的读写由控制端口控制,并通过数据端口传输。端口其他特性这里不再赘述,详细见1602液晶手册。O(∩_∩)O
二、硬件特性:
①CGRAM 和CGROM
CGRAM:character generator ram CGROM:character generator rom
CGRAM的地址空间:
CGRAM的地址是0x40~0x7F, 64个地址空间,每个地址双字节,一共128字节,一个字符 是8个字节,所以一共能显示8个自定义字符(每个双字节地址只有一个字节是被自定义字符数据写入的,另外个字节无效,因为CGARM的字符代码的规定,详细原因见下面)
字符对应的区位码如下图所示:
CGRAM: 字符产生ram,用来存放用户自定义的字符,如上图的两条(1)~(8),区位码为0x00~0x0F.0x00~0x07对应于(1)~(8);0x08~0x0F对应于下一条(1)~(8),虽然看起来有16个地址,但是其实只要8个地址可用,CGRAM的“字符码”规定0~2为地址,3位无效,4~7位全为0,因此CGRAM的字符码等效为0000X111,X为无效位,最后三位的地址只要八个,所以实际能用的只有8个。
其他为CGROM中自带的字符,区位码从0x21~0x7F,以各自的ASCII码作为区位码表示的基本字符。
将自定义的字符字模数8*8据写入,字符数据有八行,每行八位点阵。
②DDRAM
DDRAM:data display ram数据显示存储器
DDRAM的地址空间与屏幕的对应关系如下图:
DDRAM的地址空间一共有80字节
在1602中,我们只要前面16行就行,其地址和屏幕的对应关系:
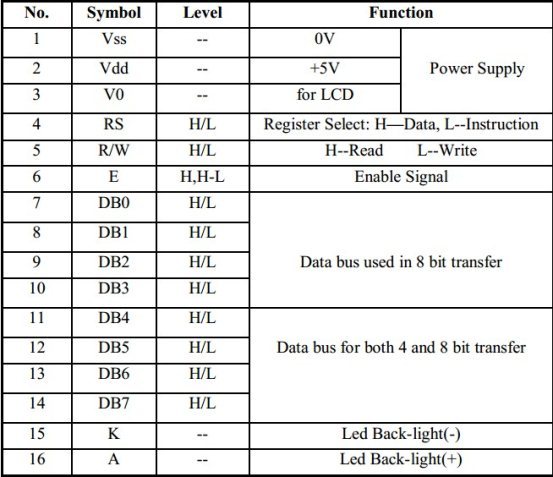
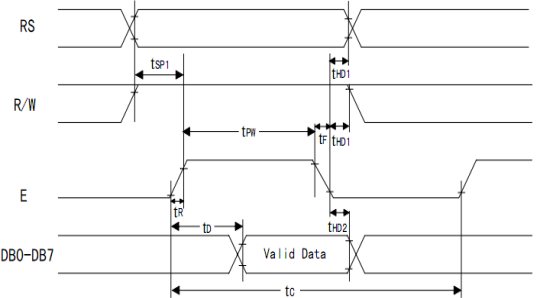
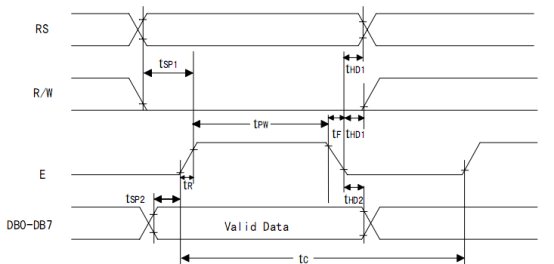
Part 2. LCD1602的时序特性
读状态:RS=0 ,RW=1,E=1
读数据:RS=1,RW=1,E=1
写命令:RS=0,RW=0,E=下降沿脉冲;DB0~DB7指令字
写数据:RS=1,RW=0,E=下降沿脉冲;DB0~DB7数据
在E=1的时候写入数据,在数据写完之后,E来一个下降沿,把数据送到LCD。
Part4.LCD1602的指令功能
<1>cursor move to first digit
<2>地址计数器AC的值设置为0;
<1>把光标撤回到显示器的左上方
<2>把地址计数器Ac设置为0;
<3>保持DDRAM的值不变
Function:
I/D set cursor move direction H:increase L:decrease
写入数据之后的光标移动的方向H:右移L:左移
S specifies shift of display H:display is shifted L:display is not shifted
写入一个数据之后显示屏移动或者不移动
D:H:显示开; L:显示关
C:H:光标开 L:光标关
B:H: 光标闪烁 L:光标不闪烁
S/C:显示屏还是光标 H:显示屏移动L:光标移动
R/L:向左移动还是向右移动H:右移L;左移(光标右移:AC值加1;光标左移:AC值减1)
DL:data length L:数据总线为4位 H:数据总线为8位
N :number line L:1行 显示 H:2行显示
F : L:5×7点阵/每字符 H:5×10点阵/每字符
7、Set CGRAM Address
设置CGRAM的地址,我们将我们自定义的字模数据存入对应的地址,从0x40~0x7F,128字节,8个字符的字模数据可存入。
- Set DDRAM Address,(表格中写错了,是DDRAM)
与CGRAM一样,在往DDRAM里面写入想要显示的字符的字符区位码的之前需要将存储字符区位码的地址首先写入。DDRAM的地址空间以上已述。(加地址的时候我们要加上0x80,因为写入地址的时候DB7必须为1)
- Read Busy Flag and the Address读取忙碌标志和地址计数器的值
BF:H:忙碌,表示无法结束单片机送来的数据;L:准备就绪,可以接受数据
当内部操作正在进行的时候,读取BF的值
AC:读取地址计数器的值
- 数据写入CGRAM和DDRAM
- 从CGRAM和DDRAM读取数据
Part5.LCD1602的简要原理
显示字库中本来就有的字符和显示自定义的字符
步骤一:系统初始化和LCD初始化
步骤二:LCD液晶屏上面每个字符对应于DDRAm的地址,你想要把字符写进屏幕哪个位置,就往DDRAM写入该位置所对应的地址。(对应的地址在上述已说)
步骤三:字库中本来已经存在的字符各自有对应的字符区位码,其实就是每个字符对应的ASCII码(见字符表格)。你要显示哪个字符,只要将该字符对应的ASCII码写入DDRAM就搞定了,这个是很简单的。
其实显示自定义的字符和字库字符差不多的,只需要将你自定义的字符用取模工具得到字模的数组数据之后。之后的步骤和显示字库字符是一样一样滴。
步骤一:系统初始化和LCD初始化
步骤二:搞清楚字符点阵的格式是5*8,通过取字模工具得出自定义字符的字模数据,再写入相应的CGRAM地址,一个地址写入一个一个字节数据(一个字节的8位,前3位为0,点阵的格式5*8)
步骤三:同显示字库中本来就有的字符一样的做法
Part 6. 基于FPGA的LCD1602使用案例
以下的程序例子是基于FPGA的液晶1602时钟,是利用自带字库的方式显示实时时钟,主要通过时钟控制状态机来实现1602的工作程序(尚未验证嘿嘿)
- library ieee;
- use ieee.std_logic_1164.all;
- use ieee.std_logic_arith.all;
- use ieee.std_logic_unsigned.all;
- entity lcd is
- port(
- clk:in std_logic;
- rw:out std_logic;
- rs:out std_logic;
- lcd_rst:out std_logic;
- data:out std_logic_vector( 7 downto 0);
- en:out std_logic
- );
- end lcd;
- architecture lcd1602 of lcd is
- signal clk_1m:std_logic:='1';
- signal clk_1s:std_logic:='1';
- type state is(s0,s1,s2,s3,s4,s5,s6,s7,s8,s9,s10);--定义状态类型case语句上有具体说明
- signal current_s:state:=s0;
- type data_buffer is array(0 to 9) of std_logic_vector(7 downto 0);---定义数组类型
- signal
- date_buf:data_buffer:=(x"30",x"31",x"3a",x"33",x"34",x"3a",x"36",x"37",x"2a",x"2a");
- signal shi,fen,miao:integer range 0 to 100:=0;
- signal shi1,fen1,miao1:integer range 0 to 100:=0;
- begin
- process(clk)---对CLK 50M进行分频系数为50的分频clk_1m
- variable cnt:integer range 0 to 10000;---得到1M的时钟
- begin
- if clk'event and clk='1' then
- if cnt=24 then
- clk_1m <= not clk_1m;cnt:=0;
- else cnt:=cnt+1;
- end if;
- end if;
- end process;
- process(clk)
- variable cnt:integer range 0 to 10000;
- variable cnt1:integer range 0 to 5000;
- begin
- if clk'event and clk='1' then
- if cnt=24900000 then ---cnt:0~24900000counter
- clk_1s <= not clk_1s;cnt:=0;------fenpin clk_1s
- elsif cnt1=2000 then cnt:=cnt+1;cnt1:=0;---cnt1: 0~2000 counter
- else cnt1:=cnt1+1;
- end if;
- end if;
- end process;
- process(clk_1s)
- begin
- if clk_1s'event and clk_1s='1' then
- if miao =59 then
- miao<=0;
- if fen=59 then
- fen<=0;
- if shi=23 then
- shi<=0;
- else shi<=shi+1;
- end if;
- else fen<=fen+1;
- end if;
- else miao<=miao+1;
- end if;
- end if;
- date_buf(0)<=conv_std_logic_vector (shi /10 ,8)+x"30";--强制转换逻辑矢量,8bit
- date_buf(1)<=conv_std_logic_vector (shi mod 10,8)+x"30";
- date_buf(3)<=conv_std_logic_vector (fen /10,8)+x"30";
- date_buf(4)<=conv_std_logic_vector (fen mod 10,8)+x"30";
- date_buf(6)<=conv_std_logic_vector (miao /10,8)+x"30";
- date_buf(7)<=conv_std_logic_vector (miao mod 10 ,8)+x"30";
- end process;
- process(clk_1m,current_s,date_buf)
- variable i:integer range 0 to 11:=0;
- variable cnt1:integer range 0 to 100;
- variable cnt2:integer range 0 to 100;
- variable cnt3:integer range 0 to 100;
- variable cnt4:integer range 0 to 100;
- variable cnt5:integer range 0 to 100;
- variable cnt6:integer range 0 to 100;
- variable cnt7:integer range 0 to 100;
- variable cnt8:integer range 0 to 60000;
- begin
- current_s<=s0;
- if (clk_1m'event and clk_1m='1') then
- current_s <= current_s ;
- case current_s is
- when s0=>
- if cnt1 <5000 then
- lcd_rst<='0';cnt1:=cnt1+1;
- elsif cnt1<10000 then
- lcd_rst<='1';cnt1:=cnt1+1;
- elsif cnt1=10000 then lcd_rst<='1';current_s<=s1;cnt1:=0;
- end if;
-
- when s1=> cnt2:=cnt2+1;----设置功能指令字:8位数据总线,两行显示,5*7点阵
- if cnt2<10 then rw<='0';rs<='0';----command 0
- elsif cnt2<20 then data<=x"38";00111000
- elsif cnt2<30 then en<='1';
- elsif cnt2<70 then en<='0';
- elsif cnt2=100 then cnt2:=0;current_s<=s2;
- end if;
- when s2=> ----显示开关控制指令:D显示开,C光标开,B光标闪烁
- cnt3:=cnt3+1;
- if cnt3<10 then rw<='0';rs<='0';
- elsif cnt3<20 then data<=x"0f";----00001111
- elsif cnt3<30 then en<='1';
- elsif cnt3<70 then en<='0';
- elsif cnt3=100 then cnt3:=0;current_s<=s3;
- end if;
- when s3=> -----输入模式设置指令,写入一个字符后光标右移,显示屏不
- cnt4:=cnt4+1; -----移动
- if cnt4<10 then rw<='0';rs<='0';
- elsif cnt4<20 then data<=x"06";---00000110
- elsif cnt4<30 then en<='1';
- elsif cnt4<70 then en<='0';
- elsif cnt4=100 then cnt4:=0;current_s<=s5;
- end if;
-
- when s4=> -----displayclear 显示清屏
- cnt5:=cnt5+1;
- if cnt5<10 then rw<='0';rs<='0';
- elsif cnt5<20 then data<=x"01";---00000001
- elsif cnt5<30 then en<='1';
- elsif cnt5<70 then en<='0';
- elsif cnt5=100 then cnt5:=0;current_s<=s5;
- end if;
-
- when s5=> -----写DDRAM地址0X00+0X80
- cnt6:=cnt6+1;
- if cnt6<10 then rw<='0';rs<='0';
- elsif cnt6<20 then data<=x"80";---10000000
- elsif cnt6<30 then en<='1';
- elsif cnt6<70 then en<='0';
- elsif cnt6=100 then cnt6:=0;current_s<=s6;
- end if;
- when s6=>
- cnt7:=cnt7+1;
- if cnt7<10 then rw<='0';rs<='1';----WRITE DATA
- elsif cnt7<20 then data<=date_buf(i);--date_buf(i);时分秒的数据的ASCII码
- elsif cnt7<30 then en<='1'; ---执行时间为40us
- elsif cnt7<70 then en<='0';
- elsif cnt7=100 then
- if i=9 then cnt7:=0;current_s<=s7;i:=0;
- else i:=i+1;current_s<=s6;cnt7:=0;end if;
- end if;
-
- when s7=>if cnt8<8000 then cnt8:=cnt8+1;
- else cnt8:=0;current_s<=s5;----循环等待8000的计数器,回到S5,继续写入DDRAM地 ------址,进而
- end if;-------------------------写入数据
- when others=>null;
- end case;
- end if;
- end process;
- end lcd1602;
-

-
基于FPGA的LCD1602原理综述.doc
447.5 KB, 下载次数: 9, 下载积分: 黑币 -5
| 欢迎光临 (http://www.51hei.com/bbs/) |
Powered by Discuz! X3.1 |