找回密码
 立即注册

QQ登录

只需一步,快速开始

搜索

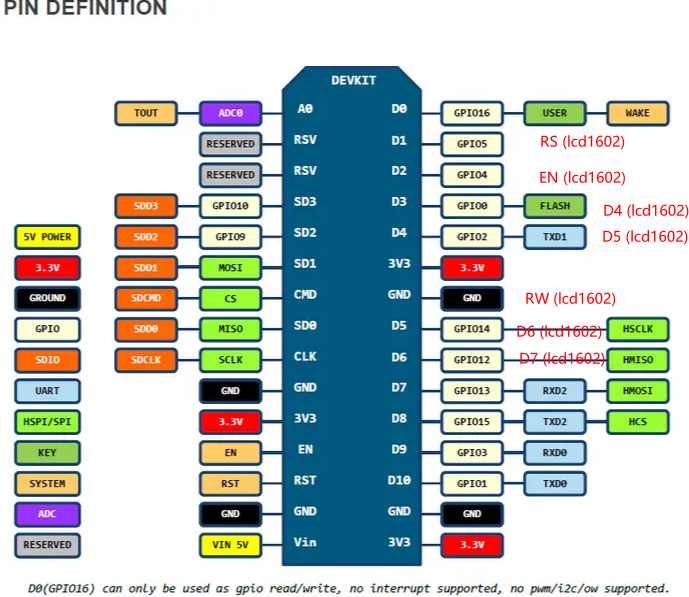
esp8266+lcd1602四线驱动接法(arduino程序)

查看数: 5802 | 评论数: 4 | 收藏 8
关灯 | 提示:支持键盘翻页<-左 右->
    组图打开中,请稍候......
发布时间: 2022-8-3 20:39

正文摘要:

硬件 esp8266开发板(ch340g)其它也差不多lcd1602 代码(lcd1602四线驱动接法,省线,速度不如八线驱动) # include <LiquidCrystal.h> // 对应gpio5,4,0,2,14,12口,5 ----> rs,4 ----> en,d4-d7 ...

回复

ID:956038 发表于 2026-6-18 23:00
#include <ESP8266WiFi.h>
#include <WiFiUdp.h>
#include <NTPClient.h>
#include <Wire.h>
#include <Adafruit_GFX.h>
#include <Adafruit_SSD1306.h>

#define  ComMode    0x52  //4COM,1/3bias  1000    010 1001  0  
#define  RCosc      0x30  //内部RC振荡器(上电默认)1000 0011 0000
#define  LCD_on     0x06  //打开LCD 偏压发生器1000     0000 0 11 0
#define  LCD_off    0x04  //关闭LCD显示
#define  Sys_en     0x02  //系统振荡器开 1000   0000 0010
#define  CTRl_cmd   0x80  //写控制命令
#define  Data_cmd   0xa0  //写数据命令

const char* ssid     = "Xiaomi_56FB";
const char* password = "zhang8114";

// 东八区,一次设置,后面不再额外加时区
WiFiUDP ntpUDP;
NTPClient timeClient(ntpUDP, "ntp.aliyun.com", 8*3600, 1000);

#define SCREEN_WIDTH 128
#define SCREEN_HEIGHT 64
Adafruit_SSD1306 display(SCREEN_WIDTH, SCREEN_HEIGHT, &Wire, -1);

#define HT_CS    D6
#define HT_WR    D7
#define HT_DATA  D8

byte segCode[] = {0xA0,0xF8,0x90,0xB8,0xC8,0x28,0x20,0xF8,0x00,0x08};
int year, month, day, week, hour, minute, second;

// --- HT1621 底层 ---
void htSendBit(byte dat){
  digitalWrite(HT_WR, LOW);
  digitalWrite(HT_DATA, dat);
  delayMicroseconds(1);
  digitalWrite(HT_WR, HIGH);
  delayMicroseconds(1);
}
void htSendByte(byte dat, byte len){
  for(byte i=0;i<len;i++){
    htSendBit(dat & 0x80);
    dat <<= 1;
  }
}
void htWriteCmd(byte cmd){
  digitalWrite(HT_CS, LOW);
  htSendByte(0x00,4);
  htSendByte(cmd,8);
  digitalWrite(HT_CS, HIGH);
}
void htWriteRam(byte addr, byte dat){
  digitalWrite(HT_CS, LOW);
  htSendByte(0xA0,4);
  htSendByte(addr<<2,6);
  htSendByte(dat,8);
  digitalWrite(HT_CS, HIGH);
}
void LCDoff(void)
{  
  htWriteCmd(LCD_off);  
}


void LCDon(void)
{  
  htWriteCmd(LCD_on);  
}
void ht1621Init(){
  pinMode(HT_DATA, OUTPUT);
  pinMode(HT_WR, OUTPUT);
  pinMode(HT_CS, OUTPUT);
  LCDoff();
  htWriteCmd(Sys_en);
  htWriteCmd(RCosc);   
  htWriteCmd(ComMode);
  htWriteCmd(LCD_on );   
  LCDon();
}
void htShowNum(byte addr, byte num){
  if(num>9) num=0;
  htWriteRam(addr, segCode[num]);
}
void htDispTime(){
  htShowNum(0, hour/10);
  htShowNum(1, hour%10);
  htShowNum(2, minute/10);
  htShowNum(3, minute%10);
  htShowNum(4, second/10);
  htShowNum(5, second%10);
}

// --- 时间解析(去掉了重复的时区偏移) ---
void parseTimeFromUnix(unsigned long epoch) {
  // 直接用timeClient给的epoch,不再+8*3600
  unsigned long secInDay = epoch % 86400;
  hour = secInDay / 3600;
  minute = (secInDay % 3600) / 60;
  second = secInDay % 60;

  unsigned long days = epoch / 86400;
  week = (days + 4) % 7; // 1970-01-01是周四,这里直接算对

  year = 1970;
  while(true) {
    unsigned long daysInYear = 365;
    if((year % 4 == 0 && year % 100 != 0) || (year % 400 == 0)) daysInYear = 366;
    if(days < daysInYear) break;
    days -= daysInYear;
    year++;
  }

  const int DAYS_PER_MONTH[] = {31,28,31,30,31,30,31,31,30,31,30,31};
  month = 0;
  while(true) {
    int daysInMonth = DAYS_PER_MONTH[month];
    if(month == 1 && ((year % 4 == 0 && year % 100 != 0) || (year % 400 == 0))) daysInMonth = 29;
    if(days < daysInMonth) break;
    days -= daysInMonth;
    month++;
  }
  month += 1;
  day = days + 1;
}

// --- OLED显示 ---
void oledDispTime(){
  display.clearDisplay();
  display.setTextSize(1);
  display.setTextColor(WHITE);
  display.setCursor(0,0);
  display.print(year);display.print("-");
  display.print(month);display.print("-");
  display.println(day);
  display.setCursor(0,16);
  display.print("Week:");display.println(week);
  display.setTextSize(2);
  display.setCursor(0,32);
  if(hour<10) display.print("0");
  display.print(hour);display.print(":");
  if(minute<10) display.print("0");
  display.print(minute);display.print(":");
  if(second<10) display.print("0");
  display.println(second);
  display.display();
}

void setup() {
  Serial.begin(9600);
  ht1621Init();
  if(!display.begin(SSD1306_SWITCHCAPVCC, 0x3C)){ while(1); }
  display.clearDisplay();
  display.display();
  WiFi.begin(ssid,password);
  while(WiFi.status() != WL_CONNECTED) delay(300);
  timeClient.begin();
}

void loop() {
  timeClient.update();
  parseTimeFromUnix(timeClient.getEpochTime());
  oledDispTime();
  htDispTime();
  delay(500);
}
ID:956038 发表于 2026-6-18 22:57
如何用ESP8266+HT1621B显示时间,我一直都点不亮
ID:830316 发表于 2023-12-31 13:35
时间哪里没有实时更新呢,博主
ID:598987 发表于 2022-8-4 20:48
  • 附上代码二,在上面的基础上。添加 心知天气 (api申请)的显示,增加一点实用性
  • 主要代码来自于 太极创客,
    1. /**********************************************************************
    2.   项目名称/Project          : 零基础入门学用物联网
    3.   程序名称/Program name     : weather_now
    4.   团队/Team                : 太极创客团队 / Taichi-Maker
    5.   作者/Author              : CYNO朔
    6.   日期/Date(YYYYMMDD)     : 20200602
    7.   程序目的/Purpose          :
    8.   通过心知天气免费服务获取实时天气信息。
    9.   -----------------------------------------------------------------------
    10.   其它说明 / Other Description
    11.   心知天气API文档说明:

    12.   本程序为太极创客团队制作的免费视频教程《零基础入门学用物联网 》中一部分。该教程系统的
    13.   向您讲述ESP8266的物联网应用相关的软件和硬件知识。
    14. ***********************************************************************/
    15. #include <ArduinoJson.h>
    16. #include <ESP8266WiFi.h>
    17. #include <LiquidCrystal.h>

    18. const char* ssid     = "bonfire";       // 连接WiFi名(此处使用taichi-maker为示例)
    19. // 请将您需要连接的WiFi名填入引号中
    20. const char* password = "1234567800";          // 连接WiFi密码(此处使用12345678为示例)
    21. // 请将您需要连接的WiFi密码填入引号中

    22. const char* host = "api.知心天气的服务器";     // 将要连接的服务器地址
    23. const int httpPort = 80;                    // 将要连接的服务器端口

    24. // 心知天气HTTP请求所需信息
    25. String reqUserKey = "xxxxxxxxxxxxxx";   // 私钥
    26. String reqLocation = "22.98486:114.7199";  // 城市
    27. String reqUnit = "c";                      // 摄氏/华氏

    28. LiquidCrystal lcd(5, 4, 0, 2, 14, 12);  // 实例化lcd驱动

    29. void setup() {
    30.   lcd.begin(16, 2); //设置行列
    31.   lcd.print("Hello Joie ^v^");//打印信息
    32.   Serial.begin(9600);
    33.   Serial.println("");

    34.   // 连接WiFi
    35.   connectWiFi();
    36. }

    37. void loop() {
    38.   // 建立心知天气API当前天气请求资源地址
    39.   String reqRes = "/v3/weather/now.json?key=" + reqUserKey +
    40.                   + "&location=" + reqLocation +
    41.                   "&language=en&unit=" + reqUnit;

    42.   // 向心知天气服务器服务器请求信息并对信息进行解析
    43.   httpRequest(reqRes);
    44.   delay(3000);

    45. //  lcd.clear();
    46. //  lcd.setCursor(0, 1); //设置光标位置
    47. //  lcd.print("time:");
    48. //  lcd.print(millis() / 1000); //计算运行时间
    49. }

    50. // 向心知天气服务器服务器请求信息并对信息进行解析
    51. void httpRequest(String reqRes) {
    52.   WiFiClient client;

    53.   // 建立http请求信息
    54.   String httpRequest = String("GET ") + reqRes + " HTTP/1.1\r\n" +
    55.                        "Host: " + host + "\r\n" +
    56.                        "Connection: close\r\n\r\n";
    57.   Serial.println("");
    58.   Serial.print("Connecting to "); Serial.print(host);

    59.   // 尝试连接服务器
    60.   if (client.connect(host, 80)) {
    61.     Serial.println(" Success!");

    62.     // 向服务器发送http请求信息
    63.     client.print(httpRequest);
    64.     Serial.println("Sending request: ");
    65.     Serial.println(httpRequest);

    66.     // 获取并显示服务器响应状态行
    67.     String status_response = client.readStringUntil('\n');
    68.     Serial.print("status_response: ");
    69.     Serial.println(status_response);

    70.     // 使用find跳过HTTP响应头
    71.     if (client.find("\r\n\r\n")) {
    72.       Serial.println("Found Header End. Start Parsing.");
    73.     }

    74.     // 利用ArduinoJson库解析心知天气响应信息
    75.     parseInfo(client);
    76.   } else {
    77.     Serial.println(" connection failed!");
    78.   }
    79.   //断开客户端与服务器连接工作
    80.   client.stop();
    81. }

    82. // 连接WiFi
    83. void connectWiFi() {
    84.   WiFi.begin(ssid, password);                  // 启动网络连接
    85.   Serial.print("Connecting to ");              // 串口监视器输出网络连接信息
    86.   Serial.print(ssid); Serial.println(" ...");  // 告知用户NodeMCU正在尝试WiFi连接

    87.   int i = 0;                                   // 这一段程序语句用于检查WiFi是否连接成功
    88.   while (WiFi.status() != WL_CONNECTED) {      // WiFi.status()函数的返回值是由NodeMCU的WiFi连接状态所决定的。
    89.     delay(1000);                               // 如果WiFi连接成功则返回值为WL_CONNECTED
    90.     Serial.print(i++); Serial.print(' ');      // 此处通过While循环让NodeMCU每隔一秒钟检查一次WiFi.status()函数返回值
    91.     lcd.setCursor(0,1);
    92.     lcd.print(i++);
    93.   }                                            // 同时NodeMCU将通过串口监视器输出连接时长读秒。
    94.   // 这个读秒是通过变量i每隔一秒自加1来实现的。
    95.   Serial.println("");                          // WiFi连接成功后
    96.   Serial.println("Connection established!");   // NodeMCU将通过串口监视器输出"连接成功"信息。
    97.   Serial.print("IP address:    ");             // 同时还将输出NodeMCU的IP地址。这一功能是通过调用
    98.   Serial.println(WiFi.localIP());              // WiFi.localIP()函数来实现的。该函数的返回值即NodeMCU的IP地址。
    99. }

    100. // 利用ArduinoJson库解析心知天气响应信息
    101. void parseInfo(WiFiClient client) {
    102.   const size_t capacity = JSON_ARRAY_SIZE(1) + JSON_OBJECT_SIZE(1) + 2 * JSON_OBJECT_SIZE(3) + JSON_OBJECT_SIZE(6) + 230;
    103.   DynamicJsonDocument doc(capacity);

    104.   deserializeJson(doc, client);

    105.   JsonObject results_0 = doc["results"][0];

    106.   JsonObject results_0_now = results_0["now"];
    107.   const char* results_0_now_text = results_0_now["text"]; // "Sunny"
    108.   const char* results_0_now_code = results_0_now["code"]; // "0"
    109.   const char* results_0_now_temperature = results_0_now["temperature"]; // "32"

    110.   const char* results_0_last_update = results_0["last_update"]; // "2020-06-02T14:40:00+08:00"

    111.   // 通过串口监视器显示以上信息
    112.   String results_0_now_text_str = results_0_now["text"].as<String>();
    113.   int results_0_now_code_int = results_0_now["code"].as<int>();
    114.   String results_0_now_temperature_str = results_0_now["temperature"].as<String>();

    115.   String results_0_last_update_str = results_0["last_update"].as<String>();

    116.   Serial.println(F("======Weahter Now======="));
    117.   Serial.print(F("Weather Now: "));
    118.   Serial.print(results_0_now_text_str);
    119.   Serial.print(F(" "));
    120.   Serial.println(results_0_now_code_int);
    121.   Serial.print(F("Temperature: "));
    122.   Serial.print(results_0_now_temperature_str);
    123.   Serial.println(F(" C"));
    124.   Serial.print(F("Last Update: "));
    125.   Serial.println(results_0_last_update_str);
    126.   Serial.println(F("========================"));

    127.   // 设置lcd1602显示信息
    128.   lcd.clear();
    129. //  delay(1000);
    130.   lcd.setCursor(0, 0);
    131.   lcd.print(results_0_now_text_str + " " + results_0_now_temperature_str + "c");
    132.   lcd.setCursor(0, 1);
    133.   lcd.print(results_0_last_update_str);
    134. }
    复制代码


评分

参与人数 1黑币 +50 收起 理由
admin + 50 回帖助人的奖励!

查看全部评分

小黑屋|51黑电子论坛 |51黑电子论坛6群 QQ 管理员QQ:125739409;技术交流QQ群281945664

Powered by 单片机教程网

快速回复 返回顶部 返回列表