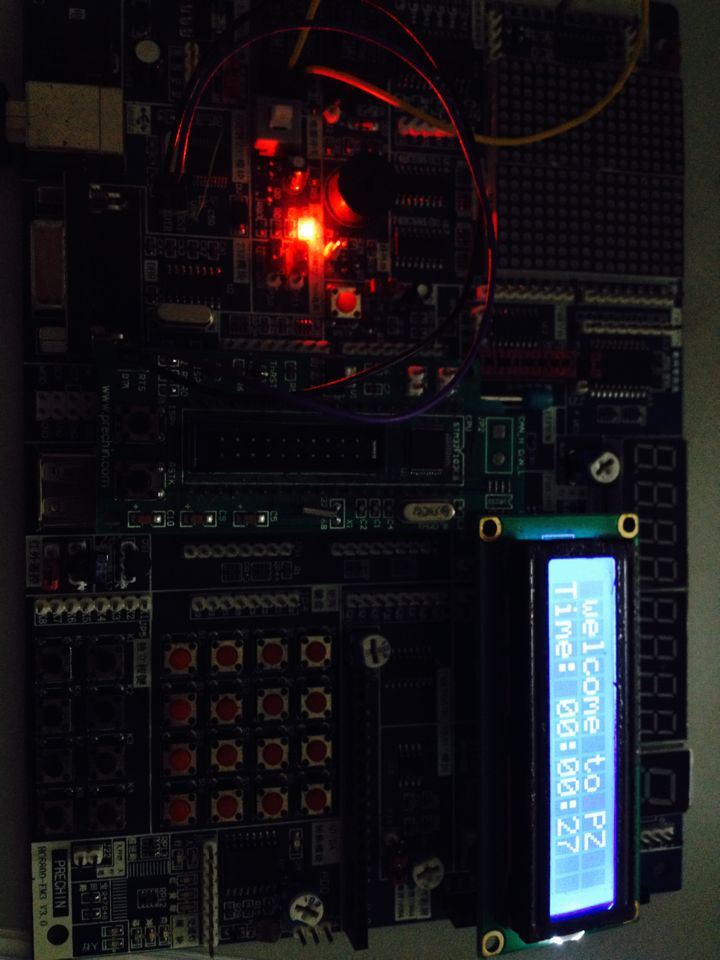
lcd1602数字钟,运行有点小错


单片机源程序如下:
- /* 下载完程序后要把BOOT1拔掉在重新上电即可看到效果 */
- #include "public.h"
- #define DATA (GPIO_Pin_8|GPIO_Pin_9|GPIO_Pin_10|GPIO_Pin_11|GPIO_Pin_12|GPIO_Pin_13|GPIO_Pin_14|GPIO_Pin_15)
- #define rs (GPIO_Pin_1)
- #define rw (GPIO_Pin_2)
- #define e (GPIO_Pin_0)
- u8 num[]="0123456789";
- u8 b[]=" welcome to PZ ";
- u8 c[6]="Time: ";
- u16 m,miao,shi,fen;
- u8 a[6];
- void GPIOINIT() //端口初始化
- {
- GPIO_InitTypeDef GPIO_InitStructure;
- GPIO_InitStructure.GPIO_Pin=DATA|rs|rw|e;
- GPIO_InitStructure.GPIO_Mode=GPIO_Mode_Out_PP;
- GPIO_InitStructure.GPIO_Speed=GPIO_Speed_50MHz;
- GPIO_Init(GPIOB,&GPIO_InitStructure);
- GPIO_PinRemapConfig(GPIO_Remap_SWJ_Disable,ENABLE);//把调试设置普通IO口
- }
- void RCCINIT() //系统初始化
- {
- SystemInit();
- RCC_APB2PeriphClockCmd(RCC_APB2Periph_GPIOB,ENABLE);
- RCC_APB1PeriphClockCmd(RCC_APB1Periph_TIM3,ENABLE);
- RCC_APB2PeriphClockCmd(RCC_APB2Periph_AFIO,ENABLE);
- //如果不加这条语句程序显示就会出错,即没有打开端口复用功能的时钟配置
- }
- u8 readbusy() //忙信号检测
- {
- u8 f;
- GPIO_ResetBits(GPIOB,rs);
- GPIO_SetBits(GPIOB,rw);
- GPIO_SetBits(GPIOB,e);
- f=((GPIO_ReadInputData(GPIOB)&0X8000));
- delayms(10);
- GPIO_ResetBits(GPIOB,e);
- return f;
- }
- void lcdwrc(u8 c)
- {
- while(readbusy());
- GPIO_ResetBits(GPIOB,rs);
- GPIO_ResetBits(GPIOB,rw);
- GPIO_ResetBits(GPIOB,e);
- delayms(1);
- GPIOB->BSRR = c<<8 & 0xf000; //将数据送到P0口
- GPIOB->BRR = ((~c)<<8) & 0xf000;
- delayms(1);
- GPIO_SetBits(GPIOB,e);
- delayms(1);
- GPIO_ResetBits(GPIOB,e);
- delayms(1);
- }
- void lcdwrc4bit(long c)
- {
- while(readbusy());
- GPIO_ResetBits(GPIOB,rs);
- GPIO_ResetBits(GPIOB,rw);
- GPIO_ResetBits(GPIOB,e);
- delayms(1);
- GPIOB->BSRR = c<<8 & 0xf000; //将数据送到P0口
- GPIOB->BRR = ((~c)<<8) & 0xf000;
- delayms(1);
- GPIO_SetBits(GPIOB,e);
- delayms(1);
- GPIO_ResetBits(GPIOB,e);
- delayms(1);
- GPIOB->BSRR = c<<12 & 0xf000; //将数据送到P0口
- GPIOB->BRR = ((~c)<<12) & 0xf000;
- delayms(1);
- GPIO_SetBits(GPIOB,e);
- delayms(1);
- GPIO_ResetBits(GPIOB,e);
- delayms(1);
- }
- void lcdwrd(long dat)
- {
- while(readbusy());
- GPIO_SetBits(GPIOB,rs);
- GPIO_ResetBits(GPIOB,rw);
- GPIO_ResetBits(GPIOB,e);
- delayms(1);
- GPIOB->BSRR = dat<<8 & 0xf000; //将数据送到P0口
- GPIOB->BRR = ((~dat)<<8) & 0xf000;
- delayms(1);
- GPIO_SetBits(GPIOB,e);
- delayms(1);
- GPIO_ResetBits(GPIOB,e);
- delayms(1);
- GPIOB->BSRR = dat<<12 & 0xf000; //将数据送到P0口
- GPIOB->BRR = ((~dat)<<12) & 0xf000;
- delayms(1);
- GPIO_SetBits(GPIOB,e);
- delayms(1);
- GPIO_ResetBits(GPIOB,e);
- delayms(1);
- GPIO_ResetBits(GPIOB,rs);
- }
- void lcdinit()
- {
- delayms(15);
- lcdwrc4bit(0x32);
- delayms(5);
- lcdwrc4bit(0x28);
- delayms(5);
- lcdwrc4bit(0x08);
- delayms(5);
- lcdwrc4bit(0x01);
- delayms(5);
- lcdwrc4bit(0x06);
- delayms(5);
- lcdwrc4bit(0x0c);
- delayms(5);
- }
- void NVICINIT()
- {
-
- NVIC_InitTypeDef NVIC_InitStructure;
- NVIC_PriorityGroupConfig(NVIC_PriorityGroup_1);
- NVIC_InitStructure.NVIC_IRQChannel=TIM3_IRQn;
- NVIC_InitStructure.NVIC_IRQChannelPreemptionPriority=0;
- NVIC_InitStructure.NVIC_IRQChannelSubPriority=1;
- NVIC_InitStructure.NVIC_IRQChannelCmd = ENABLE;
- NVIC_Init(&NVIC_InitStructure);
-
- }
- void TIMINIT()
- {
- TIM_TimeBaseInitTypeDef TIM_TimeBaseInitStructure;
- TIM_ClearITPendingBit(TIM3,TIM_IT_Update);
- TIM_TimeBaseInitStructure.TIM_Period = 2000;//如果等于2000的话是定时1s
- TIM_TimeBaseInitStructure.TIM_Prescaler = 35999;
- TIM_TimeBaseInitStructure.TIM_ClockDivision = 0;
- TIM_TimeBaseInitStructure.TIM_CounterMode = TIM_CounterMode_Up;
- TIM_TimeBaseInit(TIM3,&TIM_TimeBaseInitStructure);
-
- TIM_Cmd(TIM3,ENABLE); //使能或者失能TIMx外设
- TIM_ITConfig(TIM3, TIM_IT_Update, ENABLE ); //使能或者失能指定的TIM中断
-
- }
- void display()
- {
- u8 i;
- lcdwrc4bit(0x00+0x80);
- for(i=0;i<16;i++)
- {
- lcdwrd(b[i]);
- }
- lcdwrc4bit(0x40+0x80);
- for(i=0;i<6;i++)
- {
- lcdwrd(c[i]);
- }
- ……………………
- …………限于本文篇幅 余下代码请从51黑下载附件…………
所有资料51hei提供下载:
 163.STM32-LCD数字时钟设计.rar
(483.68 KB, 下载次数: 88)
|