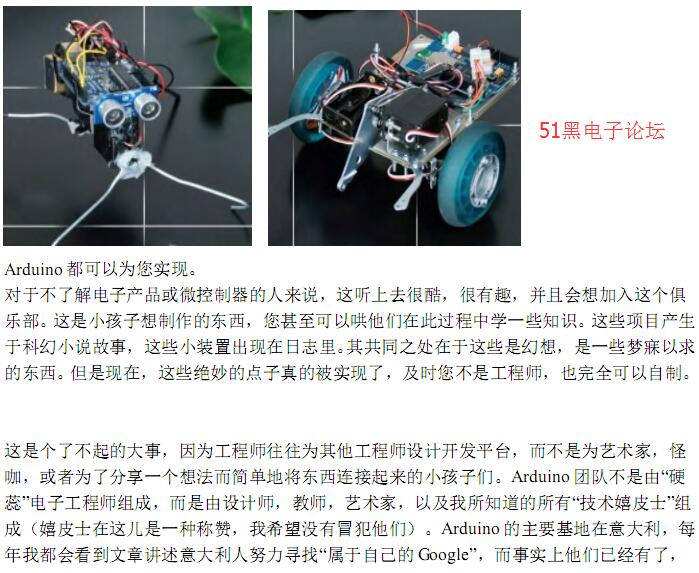
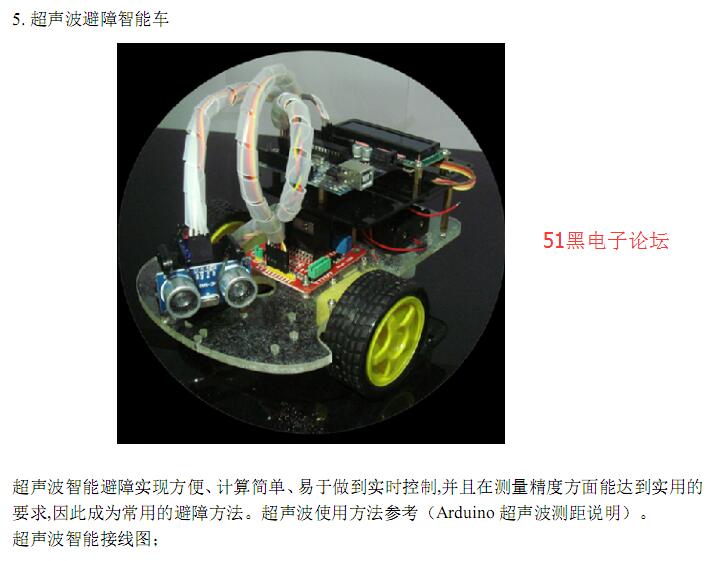
遥控超声波测距智能车的特点:
1.积木式硬件处理方式,便于理解和学习,
2.采用ARDUINO的编程方式,程序通俗易懂,不用很专业知识就可以看懂原代码,也可以通过修改,做成不同功能的智能车.
3.采用给力板做主控,一片给力板就可以实现遥控,避障,测距离,显示,外加驱动电机和舵机的功能,可见多么强大.而且给力板的电流也要比官方的板大很多,足见给力板稳定性.
4.拓展性强,智能车平台是很简易的东西,但是我们可以通过外接传感,或者功能模块,把它变成不同智能车.比如灭火机器人,搜救智能车,WIFI无线机器人,等等...............................
三. 遥控超声波测距智能车参数:
1.电机参数:电压范围:1.5-12V,电机轴长:10mm,转速6.0V 100rpm/min.
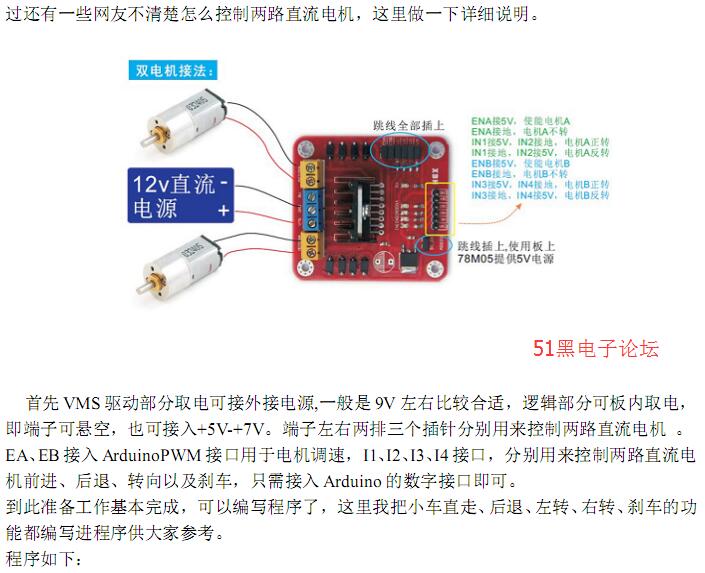
2.控制电机选用L298N驱动模块,与单片机真正隔离.
3.避障部分采用HC-SR04 超声波,性能稳定,测度距离精确.
4.显示部分采用的1602 I2C的模块,只须用到2个IO口.
5.遥控功能采用红外遥控方式,NEC协议.
6.可接入外部7~12V的电压。并能搭载多款传感器模块,根据您的想象力实现各种功能.
先来介绍一下Arduino
我们看看Arduino团队如何为其定义的:
Arduino是一个开放源码电子原型平台,拥有灵活、 易用的硬件和软件。 Arduino专为设计师,工艺美术人员,业余爱好者,以及对开发互动装置或互动式开发环境感兴趣的人而设的。Arduino可以接收来自各种传感器的输入信号从而检测出运行环境,并通过控制光源,电机以及其他驱动器来影响其周围环境。板上的微控制器编程使用Arduino编程语言(基于Wiring)和Arduino开发环境(以Processing为基础)。Arduino可以独立运行,也可以与计算机上运行的软件(例如,Flash,Processing,MaxMSP)进行通信。
Arduino硬件电路板可以自行焊接组装,也可以购买已经组装好的,软件则可以从Arduino
网站免费下载使用。您可以根据开源许可获得硬件参考设计(CAD文件),并自由地修改使其适应您的需求。
Arduino的定义仍然有点模糊,这也正是Arduino的优势所在。 Arduino是人们连接各种任务
的粘合剂。要给Arduino下一个最准确的定义,最好用一些实例来描述。
您想当咖啡煮好时,咖啡壶就发出“吱吱”声提醒您吗?
您想当邮箱有新邮件时,电话会发出警报通知您吗?
想要一件闪闪发光的绒毛玩具吗?
想要一款具备语音和酒水配送功能的X教授蒸汽朋克风格轮椅吗?
想要一套按下快捷键就可以进行实验测试蜂音器吗?
想为您的儿子自制一个《银河战士》手臂炮吗?
想自制一个心率监测器,将每次骑脚踏车的记录存进存储卡吗?
想过自制一个能在地面上绘图,能在雪中驰骋的机器人吗?
那就是Arduino,他们尚未意识到这一点。
看看Arduino项目的实例,你将发现制造者们对于这些电子产品“是什么”更加感兴趣,而不是制作方法。 这些Arduino发烧友常常表示Arduino并没有教授基本的电子产品,“呸,这哪是真正的电子产品啊,”他们说,“太容易了!”是的,的确如此。如果您是个艺术家或设计人员,在不使用Arduino情况下,想让发光二极管闪烁,或者电机转动,那么祝您好运了。 当然,如果您愿意花钱并且带着您厚重的电子产品技术教材来展示一番,这也未尝不可。但是对于那儿的其他人而言,他们不过是想用发光二级管来装饰火人节服装而已。
对于一些传统微控制器社区是如何看待Arduino这一问题,我认为最佳的例子就是AVR Freaks,该官方网站专注于AVR处理器(同样用于Arduino)。您会想AVR Freaks社区可能会喜爱Arduino,因为Arduino能够将AVR微控制器带给大众。然而,该网站的很多人并不喜欢这些非工程师们制造的所有古怪玩意儿,因为这些会破坏了他们的等级制度。我最喜欢引用一句话(我希望把这句话印在T恤上)。
“Arduino编程语言,小孩都能看懂,用一次就上瘾”—— ArnoldB,AVRfreaks网站事实上,这种错误的态度却推动Arduino粉丝去建立自己的社区,帮助了Arduino建立一个兼收并蓄,而非高高在上的社区。
Arduino是简单,但不是过于简单。它围绕这些观点来建立,即学生使用Arduino去实现目的:接收传感器信号,获得一些代码,再利用这些信号和代码。或许甚至不会写代码,那他们剪切粘贴代码后就可以开始。 Arduino是热粘结剂,而非精确的焊接。 因此没有人会被切掉一只手,也不会有实验室被烧毁。Arduino团队成员之一会教授工艺美术人员和设计者如何使用。 每天,Arduino在学习,教授,和共享代码的工程中不断建立和完善。 这些工艺美术人员和设计者正在Macs系统上使用Processing语言并修改。(Processing是Arduino的老大哥)
说到此处,Arduino就像是一个热情,没有界限,艺术氛围浓厚的集会。这就是Arduino成为“自己动手做”成功典范的原因吗?不仅仅如此,我们来了解更多具体信息。程序库——简单任务,复杂任务轻松搞定大量的封装库被用来完成复杂的任务,例如写入SD记忆卡,写入液晶显示屏驱动程序,
解析GPS。也有一些程序库用来做简单的事情,比如转动插脚或按键消抖。如果有10个芯片,我们就得将UART安装代码写10次,坦白说,这让人厌烦。如果调用Serial.begin(9600)函数来处理寄存器数据的话,那就容易多了。轻量型,直接运行在硬件底层 上使用一款经认证的,易于理解的编译器(我们甚至可以说avr-gcc是AVR默认或标准的编译器),代码能直接运行在硬件底层 上。 其编译方式与NET 语言及BASIC语言不同。 该编译器运行快,体积小,重量轻,并且您能使用HEX(十六进制)文件为成批的新芯片进行编程。
传感器
Arduino真正腾飞的原因是其能够实现将模拟输入转换为数字输入,换言之,您可以将光线,温度,声音,或者市场上已有的任何低成本的传感器信号输入,Arduino都能识别。对于数字传感器,Arduino支持 SPI( 高速同步串行口)和I2C总线。这一功能覆盖市场上99%的传感器。使用其他开发平台是不易实现的——想想如果把一块Beagleboard(伟大的产品)和Arduino绑在一起,仅仅是为了获得传感器的数据,那真是太奇怪了!
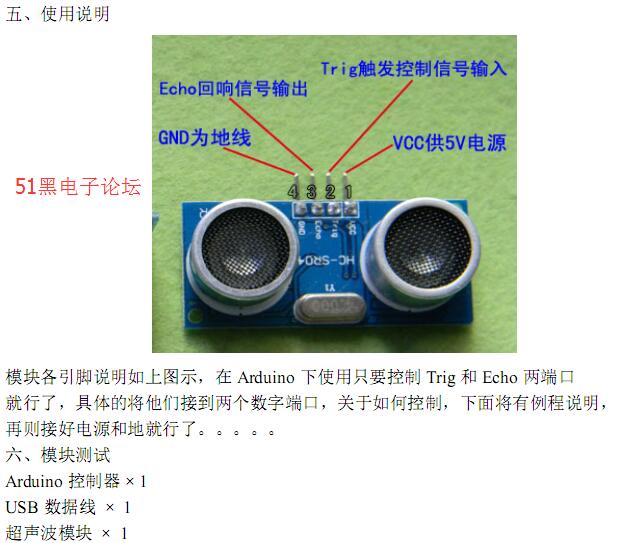
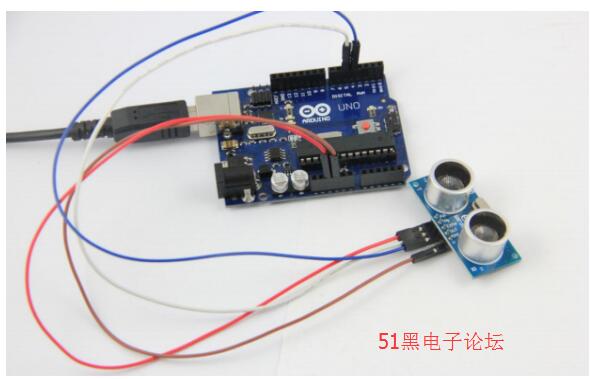
上面的 D4、D5 指的就是数字端口的 4、5 号引脚,下面还有具体的连接实物可供参考好了,我们这次要做的就是学会如何使用它去测距离,并在电脑的显示屏上显示出来,当然如果你要做的好看些,可以加个 lcd 或是数码管之类的,我们这里就是做个功能测试,就是个启发过程。
嗯,下面有我们的测试代码。
arduino源程序如下:
- #include <IRremote.h>
- #include <Servo.h>
- #include <Wire.h>
- #include <LiquidCrystal_I2C.h>
- //***********************定義馬達腳位*************************
- int MotorRight1=6;
- int MotorRight2=9;
- int MotorLeft1=10;
- int MotorLeft2=11;
- int counter=0;
- const int irReceiverPin = 3; //紅外線接收器 OUTPUT 訊號接在 pin 2
- //***********************設定所偵測到的IRcode*************************
- long IRfront= 0x00FF629D; //前進碼
- long IRback=0x00FFA857; //後退
- long IRturnright=0x00FF22DD; //右轉
- long IRturnleft= 0x00FFC23D; //左轉
- long IRstop=0x00FF02FD; //停止
- long IRAutorun=0x00FF6897; //超音波自走模式
- long IRturnsmallleft= 0x00FFB04F;
- IRrecv irrecv(irReceiverPin); // 定義 IRrecv 物件來接收紅外線訊號
- decode_results results;
- //*************************定義超音波腳位******************************
- int inputPin =A0 ; // 定義超音波信號接收腳位rx
- int outputPin =A1; // 定義超音波信號發射腳位'tx
- int Fspeedd = 0; // 前方距離
- int Rspeedd = 0; // 右方距離
- int Lspeedd = 0; // 左方距離
- int directionn = 0; // 前=8 後=2 左=4 右=6
- Servo myservo; // 設 myservo
- int delay_time = 250; // 伺服馬達轉向後的穩定時間
- int Fgo = 8; // 前進
- int Rgo = 6; // 右轉
- int Lgo = 4; // 左轉
- int Bgo = 2; // 倒車
- //********************************************************************(SETUP)
- LiquidCrystal_I2C lcd(0x27,16,2); // set the LCD address to 0x27 for a 16 chars and 2 line display
- void setup()
- {
- Serial.begin(9600);
- pinMode(MotorRight1, OUTPUT); // 腳位 8 (PWM)
- pinMode(MotorRight2, OUTPUT); // 腳位 9 (PWM)
- pinMode(MotorLeft1, OUTPUT); // 腳位 10 (PWM)
- pinMode(MotorLeft2, OUTPUT); // 腳位 11 (PWM)
- irrecv.enableIRIn(); // 啟動紅外線解碼
- digitalWrite(3,HIGH);
- pinMode(inputPin, INPUT); // 定義超音波輸入腳位
- pinMode(outputPin, OUTPUT); // 定義超音波輸出腳位
- myservo.attach(5); // 定義伺服馬達輸出第5腳位(PWM)
- lcd.init(); // initialize the lcd
- lcd.init();
- // Print a message to the LCD.
- lcd.backlight();
- }
- //******************************************************************(Void)
- void advance(int a) // 前進
- {
- digitalWrite(MotorRight1,LOW);
- digitalWrite(MotorRight2,HIGH);
- digitalWrite(MotorLeft1,LOW);
- digitalWrite(MotorLeft2,HIGH);
- delay(a * 100);
- }
- void right(int b) //右轉(單輪)
- {
- digitalWrite(MotorLeft1,LOW);
- digitalWrite(MotorLeft2,HIGH);
- digitalWrite(MotorRight1,LOW);
- digitalWrite(MotorRight2,LOW);
- delay(b * 100);
- }
- void left(int c) //左轉(單輪)
- {
- digitalWrite(MotorRight1,LOW);
- digitalWrite(MotorRight2,HIGH);
- digitalWrite(MotorLeft1,LOW);
- digitalWrite(MotorLeft2,LOW);
- delay(c * 100);
- }
- void turnR(int d) //右轉(雙輪)
- {
- digitalWrite(MotorRight1,HIGH);
- digitalWrite(MotorRight2,LOW);
- digitalWrite(MotorLeft1,LOW);
- digitalWrite(MotorLeft2,HIGH);
- delay(d * 100);
- }
- void turnL(int e) //左轉(雙輪)
- {
- digitalWrite(MotorRight1,LOW);
- digitalWrite(MotorRight2,HIGH);
- digitalWrite(MotorLeft1,HIGH);
- digitalWrite(MotorLeft2,LOW);
- delay(e * 100);
- }
- void stopp(int f) //停止
- {
- digitalWrite(MotorRight1,LOW);
- digitalWrite(MotorRight2,LOW);
- digitalWrite(MotorLeft1,LOW);
- digitalWrite(MotorLeft2,LOW);
- delay(f * 100);
- }
- void back(int g) //後退
- {
- digitalWrite(MotorRight1,HIGH);
- digitalWrite(MotorRight2,LOW);
- digitalWrite(MotorLeft1,HIGH);
- digitalWrite(MotorLeft2,LOW);;
- delay(g * 100);
- }
- void detection() //測量3個角度(前.左.右)
- {
- int delay_time = 250; // 伺服馬達轉向後的穩定時間
- ask_pin_F(); // 讀取前方距離
- if(Fspeedd < 10) // 假如前方距離小於10公分
- {
- stopp(1); // 清除輸出資料
- back(2); // 後退 0.2秒
-
- }
- if(Fspeedd < 25) // 假如前方距離小於25公分
- {
- stopp(1); // 清除輸出資料
- ask_pin_L(); // 讀取左方距離
- delay(delay_time); // 等待伺服馬達穩定
- ask_pin_R(); // 讀取右方距離
- delay(delay_time); // 等待伺服馬達穩定
- if(Lspeedd > Rspeedd) //假如 左邊距離大於右邊距離
- {
- directionn = Lgo; //向左走
- }
- if(Lspeedd <= Rspeedd) //假如 左邊距離小於或等於右邊距離
- {
- directionn = Rgo; //向右走
- }
- if (Lspeedd < 15 && Rspeedd < 15) //假如 左邊距離和右邊距離皆小於10公分
- {
- directionn = Bgo; //向後走
- }
- }
- else //加如前方大於25公分
- {
- directionn = Fgo; //向前走
- }
- }
- //*********************************************************************************
- void ask_pin_F() // 量出前方距離
- {
- myservo.write(90);
- digitalWrite(outputPin, LOW); // 讓超聲波發射低電壓2μs
- delayMicroseconds(2);
- digitalWrite(outputPin, HIGH); // 讓超聲波發射高電壓10μs,這裡至少是10μs
- delayMicroseconds(10);
- digitalWrite(outputPin, LOW); // 維持超聲波發射低電壓
- float Fdistance = pulseIn(inputPin, HIGH); // 讀差相差時間
- Fdistance= Fdistance/5.8/10; // 將時間轉為距離距离(單位:公分)
- Fspeedd = Fdistance; // 將距離 讀入Fspeedd(前速)
- }
- //********************************************************************************
- void ask_pin_L() // 量出左邊距離
- {
- myservo.write(177);
- delay(delay_time);
- digitalWrite(outputPin, LOW); // 讓超聲波發射低電壓2μs
- delayMicroseconds(2);
- digitalWrite(outputPin, HIGH); // 讓超聲波發射高電壓10μs,這裡至少是10μs
- delayMicroseconds(10);
- digitalWrite(outputPin, LOW); // 維持超聲波發射低電壓
- float Ldistance = pulseIn(inputPin, HIGH); // 讀差相差時間
- Ldistance= Ldistance/5.8/10; // 將時間轉為距離距离(單位:公分)
- Lspeedd = Ldistance; // 將距離 讀入Lspeedd(左速)
- }
- //******************************************************************************
- void ask_pin_R() // 量出右邊距離
- {
- myservo.write(5);
- delay(delay_time);
- digitalWrite(outputPin, LOW); // 讓超聲波發射低電壓2μs
- delayMicroseconds(2);
- digitalWrite(outputPin, HIGH); // 讓超聲波發射高電壓10μs,這裡至少是10μs
- delayMicroseconds(10);
- digitalWrite(outputPin, LOW); // 維持超聲波發射低電壓
- float Rdistance = pulseIn(inputPin, HIGH); // 讀差相差時間
- Rdistance= Rdistance/5.8/10; // 將時間轉為距離距离(單位:公分)
- Rspeedd = Rdistance; // 將距離 讀入Rspeedd(右速)
- }
- //******************************************************************************(LOOP)
- void loop()
- {
-
- //***************************************************************************正常遙控模式
- if (irrecv.decode(&results))
- { // 解碼成功,收到一組紅外線訊號
- /***********************************************************************/
- if (results.value == IRfront)//前進
- {
-
- lcd.setCursor(0,0);
- lcd.print(" IR mode");
- lcd.setCursor(0,1);
- lcd.print(" advance ");
- advance(20);//前進
- }
- /***********************************************************************/
- if (results.value == IRback)//後退
- {
-
- lcd.setCursor(0,0);
- lcd.print(" IR mode");
- lcd.setCursor(0,1);
- lcd.print(" back ");
- back(20);//後退
- }
- /***********************************************************************/
- if (results.value == IRturnright)//右轉
- {
-
- lcd.setCursor(0,0);
- lcd.print(" IR mode");
- lcd.setCursor(0,1);
- lcd.print(" right ");
- right(10); // 右轉
-
- }
- /***********************************************************************/
- if (results.value == IRturnleft)//左轉
- {
-
- lcd.setCursor(0,0);
- lcd.print(" IR mode");
- lcd.setCursor(0,1);
- lcd.print(" left ");
- left(10); // 左轉);
- }
- /***********************************************************************/
- if (results.value == IRstop)//停止
- {
- lcd.setCursor(0,0);
- lcd.print(" IR mode");
- lcd.setCursor(0,1);
- lcd.print(" stop ");
- digitalWrite(MotorRight1,LOW);
- digitalWrite(MotorRight2,LOW);
- digitalWrite(MotorLeft1,LOW);
- digitalWrite(MotorLeft2,LOW);
-
-
- }
- //***********************************************************************超音波自走模式
- if (results.value ==IRAutorun )
- {
- while(IRAutorun)
- {
- myservo.write(90); //讓伺服馬達回歸 預備位置 準備下一次的測量
- detection(); //測量角度 並且判斷要往哪一方向移動
- if(directionn == 8) //假如directionn(方向) = 8(前進)
- {
- if (irrecv.decode(&results))
- {
- irrecv.resume();
- Serial.println(results.value,HEX);
- if(results.value ==IRstop)
- {
- digitalWrite(MotorRight1,LOW);
- digitalWrite(MotorRight2,LOW);
- digitalWrite(MotorLeft1,LOW);
- digitalWrite(MotorLeft2,LOW);
- break;
- }
- }
- results.value=0;
-
-
- lcd.setCursor(0,0);
- lcd.print(" aoto mode");
- lcd.setCursor(0,1);
- lcd.print(" Advance ");
- advance(1); // 正常前進
- }
- if(directionn == 2) //假如directionn(方向) = 2(倒車)
- {
- if (irrecv.decode(&results))
- {
- irrecv.resume();
- Serial.println(results.value,HEX);
- if(results.value ==IRstop)
- {
- digitalWrite(MotorRight1,LOW);
- digitalWrite(MotorRight2,LOW);
- digitalWrite(MotorLeft1,LOW);
- digitalWrite(MotorLeft2,LOW);
- break;
- }
- }
- results.value=0;
-
-
- lcd.setCursor(0,0);
- lcd.print(" aoto mode");
- lcd.setCursor(0,1);
- lcd.print(" Reverse ");
- back(8); // 倒退(車)
- turnL(3); //些微向左方移動(防止卡在死巷裡)
- }
- if(directionn == 6) //假如directionn(方向) = 6(右轉)
- {
- if (irrecv.decode(&results))
- {
- irrecv.resume();
- Serial.println(results.value,HEX);
- if(results.value ==IRstop)
- {
- digitalWrite(MotorRight1,LOW);
- digitalWrite(MotorRight2,LOW);
- digitalWrite(MotorLeft1,LOW);
- digitalWrite(MotorLeft2,LOW);
- break;
- }
- }
- results.value=0;
-
-
- lcd.setCursor(0,0);
- lcd.print(" aoto mode");
- lcd.setCursor(0,1);
- lcd.print(" Right ");
- back(1);
- turnR(3); // 右轉
- }
- if(directionn == 4) //假如directionn(方向) = 4(左轉)
- {
- if (irrecv.decode(&results))
- {
- irrecv.resume();
- Serial.println(results.value,HEX);
- if(results.value ==IRstop)
- {
- digitalWrite(MotorRight1,LOW);
- digitalWrite(MotorRight2,LOW);
- digitalWrite(MotorLeft1,LOW);
- digitalWrite(MotorLeft2,LOW);
- break;
- }
- }
- results.value=0;
-
- lcd.setCursor(0,0);
- lcd.print(" aoto mode");
- lcd.setCursor(0,1);
- lcd.print(" Left ");
- back(1);
- turnL(3); // 左轉
-
- }
-
- if (irrecv.decode(&results))
- {
- irrecv.resume();
- Serial.println(results.value,HEX);
- if(results.value ==IRstop)
- {
- digitalWrite(MotorRight1,LOW);
- digitalWrite(MotorRight2,LOW);
- digitalWrite(MotorLeft1,LOW);
- digitalWrite(MotorLeft2,LOW);
- break;
- }
- }
- }
- results.value=0;
- }
- /***********************************************************************/
- else
- {
- digitalWrite(MotorRight1,LOW);
- digitalWrite(MotorRight2,LOW);
- digitalWrite(MotorLeft1,LOW);
- digitalWrite(MotorLeft2,LOW);
- }
-
- irrecv.resume(); // 繼續收下一組紅外線訊號
- }
- …………
- …………限于本文篇幅 余下代码请从51黑下载附件…………
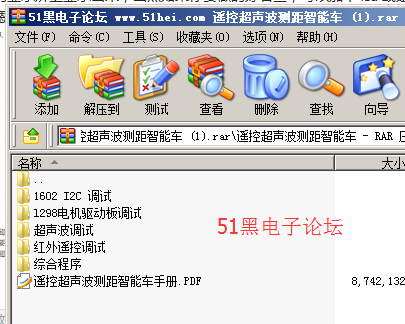
 遥控超声波测距智能车 (1).rar
(9.79 MB, 下载次数: 36)
|