外国朋友做的,资料全部都是英文的.
包含焊接图
C程序代码
上位机软件

全部资料51hei下载地址:
 3D光立方.zip
(5.85 MB, 下载次数: 38)
3D光立方.zip
(5.85 MB, 下载次数: 38)
Step 1: welding first welding control panel above a few components: Positive: Reserved in our suite does not contain the components of the interface (2 red button and row needles) On the back: Step 2: the welding LED socket
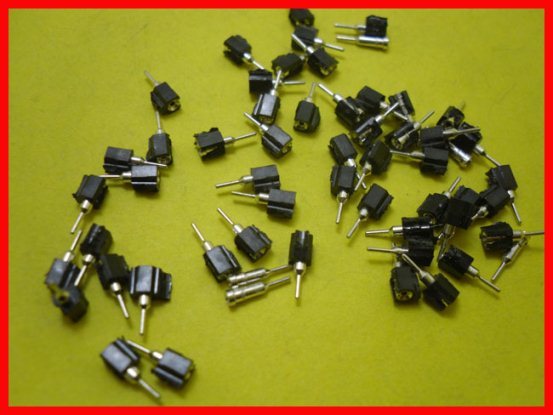
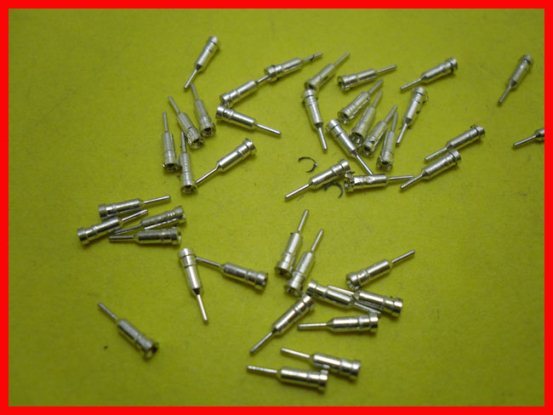
Mother put 40 p round water cutting pliers or diagonal cutting pliers cut into single needle: Then water cutting pliers or diagonal cutting pliers cut the needle seat next to the plastic, cut out the water cutting pliers is better, of course not can also be cut and is less beautiful: After LED carrier was packed can welding: Step 3: welding
All positive elements after welding can be welded on the back of the chip carrier, good welding after mount chip, chip time pay attention to the direction of the chip, not to the:  Step 4: welding
At this point light cube panel welding.Next structures, leds, the panel above the distance of the light and the light is 1 CM * 1 CM, the distance is small, advice LED don't plug directly into the control panel, Suggestions on the universal board, between 1.5 CM to 2 CM distance control is more appropriate.
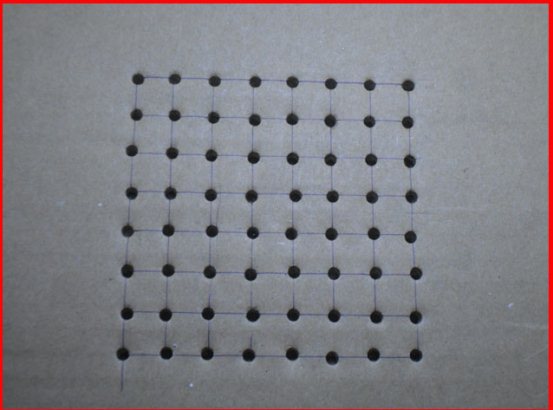
Build a cardboard on top of the first step to find one to draw you the distance to the lamp (if there is a small bench drill can use wood, acrylic, etc instead of cardboard is better, if there is no small bench drill, cardboard must find more thick more hard), if it is built on the control panel directly, the distance is 1 cm, can draw on if set up the universal plate 1.5 to 2 cm, if there is a bench drill after the draw with drill, no bench drill out after nailed can also, bit and nails with a diameter of 3 mm:
Step 5:
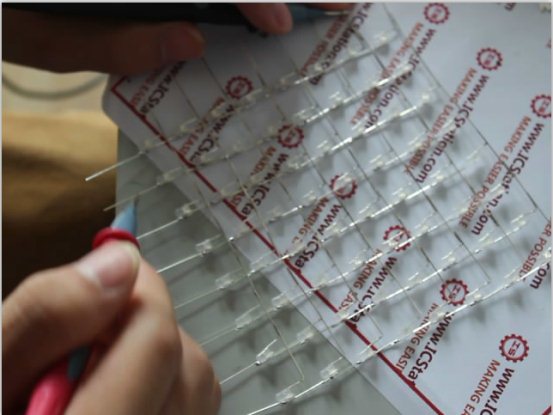
The plastic LED to 512 all the form below:
Should be paid attention to: plastic LED LED in corners or Angle, please don't being too close to colloid, should with gel to keep a distance of more than 2 mm, otherwise it will make the LED colloid separation stents with gold thread, inside corner folding number cannot be more than three times in the same place, the corner a 90 ° bend back to the original position to 1 times. 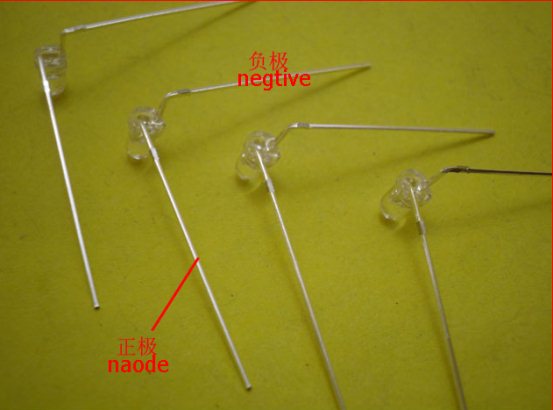
Step 6:
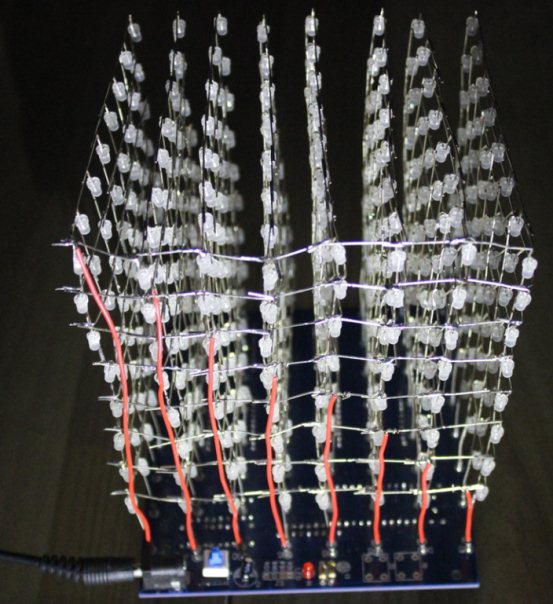
LED all can then after plastic good welding LED, LED light cube is divided into eight noodles to welding, a surface consists of 8 * 8 = 64 LED 8 surface welding to each surface of common cathode welded together (layer beam with Yang Yin), comprise an 8 * 8 * 8 cubic light.
The welding method:

LED welding precautions:
1. Starting from the lattice of the lower right corner welding, welding to note:
Welding speed when the LED quickly, as far as possible for each solder joint in two seconds good welding, the welding point from the bottom of the colloid above 2.5 mm, solder iron temperature is too high to burn out the LED to prevent welding is very slow.Through the practice, with 30 w to about 40 w iron the more appropriate, soldering iron must be grounded, it is best to use with grounding soldering iron, prevent electrostatic breakdown or damage to the LED;
2. Every welding line to test, will look at the LED light, LED against the polarity welding or prevent the bad LED welding.
Test method: multimeter (short circuit at the number of universal meter), black pen diode cathode, diode cathode red pen, each test in the past, if the LED light.
3. After each welding good also to test
Test images:
Here is a good welding on the surface of the two pictures: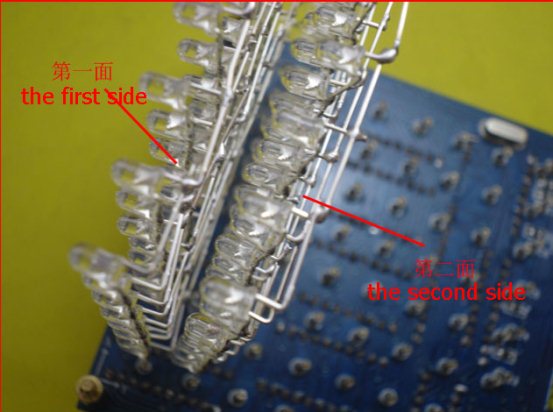 Build good after eight sides, each of the faces, namely the negative electrode layer (8) together, and then received a layer control, the following figure:
To this light cube can build good electric test.
单片机源程序如下: - #include <REG52.H>
- #include <intrins.h>
- #define uchar unsigned char
- #define uint unsigned int
- uchar display[8][8];
- /*rank:A,1,2,3,4,I,心,U*/
- uchar code table_cha[8][8]={0x51,0x51,0x51,0x4a,0x4a,0x4a,0x44,0x44,0x18,0x1c,0x18,0x18,0x18,0x18,0x18,0x3c,0x3c,0x66,0x66,0x30,0x18,0xc,0x6,0xf6,0x3c,0x66,0x60,0x38,0x60,0x60,0x66,0x3c,0x30,0x38,0x3c,0x3e,0x36,0x7e,0x30,0x30,0x3c,0x3c,0x18,0x18,0x18,0x18,0x3c,0x3c,0x66,0xff,0xff,0xff,0x7e,0x3c,0x18,0x18,0x66,0x66,0x66,0x66,0x66,0x66,0x7e,0x3c};
- /*the "ideasoft"*/
- uchar code table_id[40]={0x81,0xff,0x81,0x00,0xff,0x81,0x81,0x7e,0x00,0xff,0x89,0x89,0x00,0xf8,0x27,0x27,0xf8,0x00,0x8f,0x89,0x89,0xf9,0x00,0xff,0x81,0x81,0xff,0x00,0xff,0x09,0x09,0x09,0x01,0x0,0x01,0x01,0xff,0x01,0x01,0x00};
- /*railway*/
- uchar code dat[128]={0x0,0x20,0x40,0x60,0x80,0xa0,0xc0,0xe0,0xe4,0xe8,0xec,0xf0,0xf4,0xf8,0xfc,0xdc,0xbc,0x9c,0x7c,0x5c,0x3c,0x1c,0x18,0x14,0x10,0xc,0x8,0x4,0x25,0x45,0x65,0x85,0xa5,0xc5,0xc9,0xcd,0xd1,0xd5,0xd9,0xb9,0x99,0x79,0x59,0x39,0x35,0x31,0x2d,0x29,0x4a,0x6a,0x8a,0xaa,0xae,0xb2,0xb6,0x96,0x76,0x56,0x52,0x4e,0x6f,0x8f,0x93,0x73,0x6f,0x8f,0x93,0x73,0x4a,0x6a,0x8a,0xaa,0xae,0xb2,0xb6,0x96,0x76,0x56,0x52,0x4e,0x25,0x45,0x65,0x85,0xa5,0xc5,0xc9,0xcd,0xd1,0xd5,0xd9,0xb9,0x99,0x79,0x59,0x39,0x35,0x31,0x2d,0x29,0x0,0x20,0x40,0x60,0x80,0xa0,0xc0,0xe0,0xe4,0xe8,0xec,0xf0,0xf4,0xf8,0xfc,0xdc,0xbc,0x9c,0x7c,0x5c,0x3c,0x1c,0x18,0x14,0x10,0xc,0x8,0x4};
- /*railway 2*/
- uchar code dat2[28]={0x0,0x20,0x40,0x60,0x80,0xa0,0xc0,0xe0,0xe4,0xe8,0xec,0xf0,0xf4,0xf8,0xfc,0xdc,0xbc,0x9c,0x7c,0x5c,0x3c,0x1c,0x18,0x14,0x10,0xc,0x8,0x4};
- /*railway 3*/
- uchar code dat3[24]={0x00,0x01,0x02,0x03,0x04,0x05,0x06,0x16,0x26,0x36,0x46,0x56,0x66,0x65,0x64,0x63,0x62,0x61,0x60,0x50,0x40,0x30,0x20,0x10};
- /*3p char*/
- uchar code table_3p[3][8]={0xff,0x89,0xf5,0x93,0x93,0xf5,0x89,0xff,0x0e,0x1f,0x3f,0x7e,0x7e,0x3f,0x1f,0x0e,0x18,0x3c,0x7e,0xff,0x18,0x18,0x18,0x18};
- /*initializtion
- That is to initialize the program .
- It is write to set the timer in c52 mcu.
- So the program can renovate the led_3d_cube in fixed time use the interrupt function.*/
- void sinter()
- {
- IE=0x82;
- TCON=0x01;
- TH0=0xc0;
- TL0=0;
- TR0=1;
- }
- void delay5us(void) //误差 -0.026765046296us STC 1T 22.1184Mhz
- {
- unsigned char a,b;
- for(b=7;b>0;b--)
- for(a=2;a>0;a--);
- }
- void delay(uint i)
- {
- while (i--){
- delay5us();}//12t的mcu 注释这个延时即可
- }
- /*To judge the num bit*/
- uchar judgebit(uchar num,uchar b)
- {
- char n;
- num=num&(1<<b);
- if (num)
- n=1;
- else
- n=0;
- return n;
- }
- /*To figure out the round number*/
- uchar abs(uchar a)
- {
- uchar b;
- b=a/10;
- a=a-b*10;
- if (a>=5)
- b++;
- return b;
- }
- /*To figure out the absolute value*/
- uchar abss(char a)
- {
- if (a<0)
- a=-a;
- return a;
- }
- /*The function can comparat the character.
- And remove the big one to the back.*/
- void max(uchar *a,uchar *b)
- {
- uchar t;
- if ((*a)>(*b))
- {
- t=(*a);
- (*a)=(*b);
- (*b)=t;
- }
- }
- /*The function is to figure out the max number and return it.*/
- uchar maxt(uchar a,uchar b,uchar c)
- {
- if (a<b)
- a=b;
- if (a<c)
- a=c;
- return a;
- }
- void clear(char le)
- {
- uchar i,j;
- for (j=0;j<8;j++)
- {
- for (i=0;i<8;i++)
- display[j][i]=le;
- }
- }
- void trailler(uint speed)
- {
- char i,j;
- for (i=6;i>=-3;i--)
- {
- if (i>=0)
- {
- for (j=0;j<8;j++)
- display[j][i]=display[j][i+1];
- }
- if (i<4)
- {
- for (j=0;j<8;j++)
- display[j][i+4]=0;
- }
- delay(speed);
- }
- }
- void point(uchar x,uchar y,uchar z,uchar le)
- {
- uchar ch1,ch0;
- ch1=1<<x;
- ch0=~ch1;
- if (le)
- display[z][y]=display[z][y]|ch1;
- else
- display[z][y]=display[z][y]&ch0;
- }
- void type(uchar cha,uchar y)
- {
- uchar xx;
- for (xx=0;xx<8;xx++)
- {
- display[xx][y]=table_cha[cha][xx];
- }
- }
- /*The first variable is the distance from the midpoint.
- The second is the layer.
- the third is the flash speed of the time between each two point.
- The forth is the enable io,it controls weather draw or claen.*/
- void cirp(char cpp,uchar dir,uchar le)
- {
- uchar a,b,c,cp;
- if ((cpp<128)&(cpp>=0))
- {
- if (dir)
- cp=127-cpp;
- else
- cp=cpp;
- a=(dat[cp]>>5)&0x07;
- b=(dat[cp]>>2)&0x07;
- c=dat[cp]&0x03;
- if (cpp>63)
- c=7-c;
- point (a,b,c,le);
- }
- }
- void line(uchar x1,uchar y1,uchar z1,uchar x2,uchar y2,uchar z2,uchar le)
- {
- char t,a,b,c,a1,b1,c1,i;
- a1=x2-x1;
- b1=y2-y1;
- c1=z2-z1;
- t=maxt(abss(a1),abss(b1),abss(c1));
- a=x1*10;
- b=y1*10;
- c=z1*10;
- a1=a1*10/t;
- b1=b1*10/t;
- c1=c1*10/t;
- for (i=0;i<t;i++)
- {
- point(abs(a),abs(b),abs(c),le);
- a+=a1;
- b+=b1;
- c+=c1;
- }
- point(x2,y2,z2,le);
- }
- void box(uchar x1,uchar y1,uchar z1,uchar x2,uchar y2,uchar z2,uchar fill,uchar le)
- {
- uchar i,j,t=0;
- max(&x1,&x2);
- max(&y1,&y2);
- max(&z1,&z2);
- for (i=x1;i<=x2;i++)
- t|=1<<i;
- if (!le)
- t=~t;
- if (fill)
- {
- if (le)
- {
- for (i=z1;i<=z2;i++)
- {
- for (j=y1;j<=y2;j++)
- display[j][i]|=t;
- }
- }
- else
- {
- for (i=z1;i<=z2;i++)
- {
- for (j=y1;j<=y2;j++)
- display[j][i]&=t;
- }
- }
- }
- else
- {
- if (le)
- {
- display[y1][z1]|=t;
- display[y2][z1]|=t;
- display[y1][z2]|=t;
- display[y2][z2]|=t;
- }
- else
- {
- display[y1][z1]&=t;
- display[y2][z1]&=t;
- display[y1][z2]&=t;
- display[y2][z2]&=t;
- }
- t=(0x01<<x1)|(0x01<<x2);
- if (!le)
- t=~t;
- if (le)
- {
- for (j=z1;j<=z2;j+=(z2-z1))
- {
- for (i=y1;i<=y2;i++)
- display[i][j]|=t;
- }
- for (j=y1;j<=y2;j+=(y2-y1))
- {
- for (i=z1;i<=z2;i++)
- display[j][i]|=t;
- }
- }
- else
- {
- for (j=z1;j<=z2;j+=(z2-z1))
- {
- for (i=y1;i<=y2;i++)
- {
- display[i][j]&=t;
- }
- }
- for (j=y1;j<=y2;j+=(y2-y1))
- {
- for (i=z1;i<=z2;i++)
- {
- display[j][i]&=t;
- }
- }
- }
- }
- }
- void box_apeak_xy(uchar x1,uchar y1,uchar z1,uchar x2,uchar y2,uchar z2,uchar fill,uchar le)
- {
- uchar i;
- max(&z1,&z2);
- if (fill)
- {
- for (i=z1;i<=z2;i++)
- {
- line (x1,y1,i,x2,y2,i,le);
- }
- }
- else
- {
- line (x1,y1,z1,x2,y2,z1,le);
- line (x1,y1,z2,x2,y2,z2,le);
- line (x2,y2,z1,x2,y2,z2,le);
- line (x1,y1,z1,x1,y1,z2,le);
- }
- }
- void poke(uchar n,uchar x,uchar y)
- {
- uchar i;
- for (i=0;i<8;i++)
- {
- point(x,y,i,judgebit(n,i));
- }
- }
- void boxtola(char i,uchar n)
- {
- if ((i>=0)&(i<8))
- {
- poke(n,0,7-i);
- }
- if ((i>=8)&(i<16))
- {
- poke(n,i-8,0);
- }
- if ((i>=16)&(i<24))
- {
- poke(n,7,i-16);
- }
-
- }
- void rolldisplay(uint speed)
- {
- uchar j;
- char i,a;
- for (i=23;i>-40;i--)
- {
- for (j=0;j<40;j++)
- {
- a=i+j;
- if ((a>=0)&(a<24))
- boxtola(a,table_id[j]);
- }
- delay(speed);
- }
- }
- void roll_apeak_yz(uchar n,uint speed)
- {
- uchar i;
- switch(n)
- {
- case 1:
- for (i=0;i<7;i++)
- {
- display[i][7]=0;
- display[7][6-i]=255;
- delay(speed);
- };
- break;
- case 2:
- for (i=0;i<7;i++)
- {
- display[7][7-i]=0;
- display[6-i][0]=255;
- delay(speed);
- };
- break;
- case 3:
- for (i=0;i<7;i++)
- {
- display[7-i][0]=0;
- display[0][i+1]=255;
- delay(speed);
- };
- break;
- case 0:
- for (i=0;i<7;i++)
- {
- display[0][i]=0;
- display[i+1][7]=255;
- delay(speed);
- };
- }
- }
- void roll_apeak_xy(uchar n,uint speed)
- {
- uchar i;
- switch(n)
- {
- case 1:
- for (i=0;i<7;i++)
- {
- line(0,i,0,0,i,7,0);
- line(i+1,7,0,i+1,7,7,1);
- delay(speed);
- };
- break;
- case 2:
- for (i=0;i<7;i++)
- {
- line(i,7,0,i,7,7,0);
- line(7,6-i,0,7,6-i,7,1);
- delay(speed);
- };
- break;
- case 3:
- for (i=0;i<7;i++)
- {
- line(7,7-i,0,7,7-i,7,0);
- line(6-i,0,0,6-i,0,7,1);
- delay(speed);
- };
- break;
- case 0:
- for (i=0;i<7;i++)
- {
- line(7-i,0,0,7-i,0,7,0);
- line(0,i+1,0,0,i+1,7,1);
- delay(speed);
- };
- }
- }
- void roll_3_xy(uchar n,uint speed)
- {
- uchar i;
- switch(n)
- {
- case 1:
- for (i=0;i<8;i++)
- {
- box_apeak_xy (0,i,0,7,7-i,7,1,1);
- delay(speed);
- if (i<7)
- box_apeak_xy (3,3,0,0,i,7,1,0);
- };
- break;
- case 2:
- for (i=0;i<8;i++)
- {
- box_apeak_xy (7-i,0,0,i,7,7,1,1);
- delay(speed);
- if (i<7)
- box_apeak_xy (3,4,0,i,7,7,1,0);
- };
- break;
- case 3:
- for (i=0;i<8;i++)
- {
- box_apeak_xy (0,i,0,7,7-i,7,1,1);
- delay(speed);
- if (i<7)
- box_apeak_xy (4,4,0,7,7-i,7,1,0);
- };
- break;
- case 0:
- for (i=0;i<8;i++)
- {
- box_apeak_xy (7-i,0,0,i,7,7,1,1);
- delay(speed);
- if (i<7)
- box_apeak_xy (4,3,0,7-i,0,7,1,0);
- };
- }
- }
- void trans(uchar z,uint speed)
- {
- uchar i,j;
- for (j=0;j<8;j++)
- {
- for (i=0;i<8;i++)
- {
- display[z][i]>>=1;
- }
- delay(speed);
- }
- }
- void tranoutchar(uchar c,uint speed)
- {
- uchar i,j,k,a,i2=0;
- for (i=0;i<8;i++)
- {
- if (i<7)
- box_apeak_xy (i+1,0,0,i+1,7,7,1,1);
- box_apeak_xy (i2,0,0,i2,7,7,1,0);
- a=0;
- i2=i+1;
- for (j=0;j<=i;j++)
- {
- a=a|(1<<j);
- }
- for (k=0;k<8;k++)
- {
- display[k][3]|=table_cha[c][k]&a;
- display[k][4]|=table_cha[c][k]&a;
- }
- delay(speed);
- }
- }
- void transss()
- {
- uchar i,j;
- for (i=0;i<8;i++)
- {
- for (j=0;j<8;j++)
- display[i][j]<<=1;
- }
- }
-
- /*From now on,the function below is to display the flash.*/
- void flash_1()
- {
-
- clear(0);
- type(1,0);
- delay(60000);
- type(2,0);
- delay(60000);
- type(3,0);
- delay(60000);
- type(4,0);
- delay(60000);
- delay(60000);
- clear(0);
- rolldisplay(30000);
- type(0,7);
- delay(60000);
- trailler(6000);
- delay(60000);
- }
- void flash_2()
- {
- uchar i;
- for (i=129;i>0;i--)
- {
- cirp(i-2,0,1);
- delay(8000);
- cirp(i-1,0,0);
- }
- delay(8000);
- for (i=0;i<136;i++)
- {
- cirp(i,1,1);
- delay(8000);
- cirp(i-8,1,0);
- }
- delay(8000);
- for (i=129;i>0;i--)
- {
- cirp(i-2,0,1);
- delay(8000);
- }
- delay(8000);
- for (i=0;i<128;i++)
- {
- cirp(i-8,1,0);
- delay(8000);
- }
- delay(60000);
- }
- void flash_3()
- {
- char i;
- for (i=0;i<8;i++)
- {
- box_apeak_xy(0,i,0,7,i,7,1,1);
- delay(20000);
- if (i<7)
- box_apeak_xy(0,i,0,7,i,7,1,0);
- }
- for (i=7;i>=0;i--)
- {
- box_apeak_xy(0,i,0,7,i,7,1,1);
- delay(20000);
- if (i>0)
- box_apeak_xy(0,i,0,7,i,7,1,0);
- }
- for (i=0;i<8;i++)
- {
- box_apeak_xy(0,i,0,7,i,7,1,1);
- delay(20000);
- if (i<7)
- box_apeak_xy(0,i,0,7,i,7,1,0);
- }
- }
- void flash_4()
- {
- char i,j,an[8];
- for (j=7;j<15;j++)
- an[j-7]=j;
- for (i=0;i<=16;i++)
- {
- for (j=0;j<8;j++)
- {
- if ((an[j]<8)&(an[j]>=0))
- line(0,an[j],j,7,an[j],j,1);
- }
- for (j=0;j<8;j++)
- {
- if (((an[j]+1)<8)&(an[j]>=0))
- line(0,an[j]+1,j,7,an[j]+1,j,0);
- }
- for (j=0;j<8;j++)
- {
- if (an[j]>0)
- an[j]--;
- }
- delay(15000);
- }
- for (j=0;j<8;j++)
- an[j]=1-j;
- for (i=0;i<=16;i++)
- {
- for (j=0;j<8;j++)
- {
- if ((an[j]<8)&(an[j]>=0))
- line(0,an[j],j,7,an[j],j,1);
- }
- for (j=0;j<8;j++)
- {
- if (((an[j]-1)<7)&(an[j]>0))
- line(0,an[j]-1,j,7,an[j]-1,j,0);
- }
- for (j=0;j<8;j++)
- {
- if (an[j]<7)
- ……………………
- …………限于本文篇幅 余下代码请从51黑下载附件…………
|


 QQ好友和群
 QQ空间
QQ空间 腾讯微博
腾讯微博 腾讯朋友
腾讯朋友 收藏
收藏 淘帖
淘帖 顶
顶 踩
踩

