该程序是基于“4_PWM的实现”中的程序改编的。代码如下:
- void Change_PWM(int duty1,int duty2,int duty3,int duty4)
- {
- SCB->AIRCR=0x05AF00;// 中断优先级分组 抢占:响应=3:1
- RCC->AHB1ENR|=(1<<2);// 打开GPIOC时钟
- GPIOC->MODER|=0x000AA000;// pc6789第二功能,推挽输出
- GPIOC->OSPEEDR|=0x000FF000;//输出速度为100m
- GPIOC->PUPDR|=0x00055000;//上拉
-
- GPIOC->AFR[0]|=0x22000000;//pc6789的第二功能为AF2
- GPIOC->AFR[1]|=0x00000022;
-
- RCC->APB1ENR|=(1<<1);//打开TIM3时钟
- TIM3->PSC=83;//对84M时钟进行84分频,使得计数频率为1M
- TIM3->ARR=10000;//周期为10ms
- TIM3->EGR|=1;//产生一次更新时间
-
- TIM3->CCMR1|=0x6060;//PWM模式1
- TIM3->CCMR2|=0x6060;//PWM模式2
-
- TIM3->CCR1=duty1;//1路PWM
- TIM3->CCR2=duty2;//2路PWM
- TIM3->CCR3=duty3;//3路PWM
- TIM3->CCR4=duty4;//4路PWM
-
- TIM3->CCER|=0x1111;//使能比较输出
-
- TIM3->CCMR1|=0x0808;//启动预装载
- TIM3->CCMR2|=0x8080;
-
- TIM3->CR1|=1;//开始计时
- }
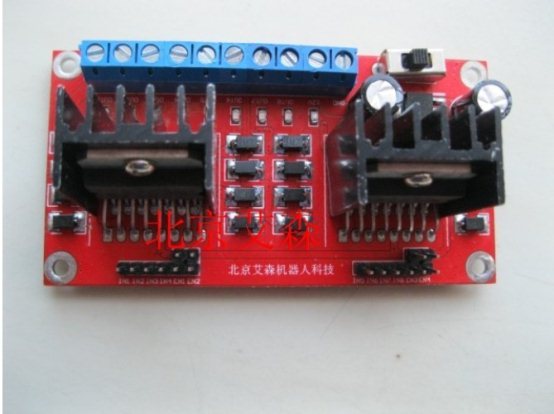
改程序将电机驱动模块的8个输入端口接到了主控板的8个GPIO口,通过推挽输出,从而控制电机的转向,代码如下:
- void Direction(int direction)
- {
- SysTick_Config(SystemCoreClock / 1000); //时钟中断设为1ms
- RCC->AHB1ENR |= 0x00000005; //使能GPIOA和GPIOD时钟
- RCC->APB2ENR |= (1<<14); //使能syscfg时钟
- if(direction==0)
- {
- GPIOA->MODER &= 0xffff0000; //设置PA0,1,2,3为输出
- GPIOA->MODER |= 0x00005555;
- GPIOA->OTYPER &= 0xFFFFff00; //设置PA0,1,2,3为推挽输出
- GPIOA->OSPEEDR &= 0xffff0000; //设置PA0,1,2,3的输出速度为100M
- GPIOA->OSPEEDR |= 0x0000ffff;
- SYSCFG->CMPCR = 0x00000001; //使用IO补偿单元
- GPIOA->PUPDR &= 0xffffff00; //设置PA0,1,2,3无上拉,无下拉
- GPIOA->BSRRH = 0x00ff; //复位GPIOA_BSRRH寄存器
- GPIOA->BSRRL = 0x0055;
- }
- else
- {
- GPIOA->MODER &= 0xffff0000; //设置PA0,1,2,3为输出
- GPIOA->MODER |= 0x0000005555;
- GPIOA->OTYPER &= 0xFFFFff00; //设置PA0,1,2,3为推挽输出
- GPIOA->OSPEEDR &= 0xffff0000; //设置PA0,1,2,3的输出速度为100M
- GPIOA->OSPEEDR |= 0x0000ffff;
- SYSCFG->CMPCR = 0x00000001; //使用IO补偿单元
- GPIOA->PUPDR &= 0xffffff00; //设置PA0,1,2,3无上拉,无下拉
- GPIOA->BSRRH = 0x00ff; //复位GPIOA_BSRRH寄存器
- GPIOA->BSRRL = 0x00AA;
- }
- }
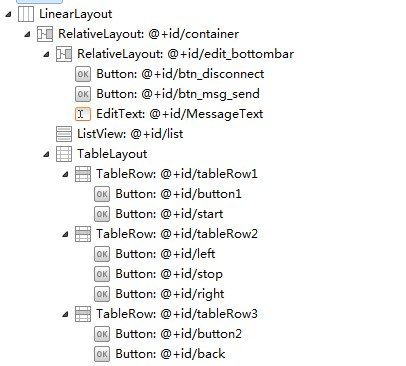
控制界面主要运用了线性布局、相对布局和表格布局。整体采用线性布局,局部采用相对布局,而控制按钮采用了表格布局。控制界面的布局如图4.1所示:
图4.1 控制界面的布局
4.2.2 布局的代码如下:<?xml version="1.0" encoding="utf-8"?>
<LinearLayout xmlns:android="http://schemas.android.com/apk/res/android"
android:layout_width="wrap_content"
android:layout_height="fill_parent"
android:orientation="vertical" >
<RelativeLayout
android:id = "@+id/container"
android:orientation="vertical"
android:layout_width="fill_parent"
android:layout_height="fill_parent"
>
<RelativeLayout
android:layout_width="fill_parent"
android:layout_height="wrap_content"
android:id= "@+id/edit_bottombar"
android:layout_alignParentBottom = "true">
<Button android:id="@+id/btn_disconnect"
android:layout_width="65dp"
android:layout_height="wrap_content"
android:layout_alignParentLeft ="true"
android:text="断开"/>
<Button android:id="@+id/btn_msg_send"
android:layout_width="65dp"
android:layout_height="wrap_content"
android:layout_alignParentRight ="true"
android:text="发送"/>
<EditText
android:id="@+id/MessageText"
android:layout_width="98dp"
android:layout_height="wrap_content"
android:layout_toRightOf="@+id/btn_disconnect"
android:hint="说点什么呢?"
android:textSize="15dip"
/>
</RelativeLayout>
<ListView
android:id="@+id/list"
android:layout_width="wrap_content"
android:layout_height="wrap_content"
android:layout_above="@id/edit_bottombar"
android:layout_below="@id/container"
android:layout_weight="1.0"
android:divider="#ffc6c6c6"
android:scrollingCache="false"
android:visibility="visible" />
<TableLayout
android:layout_width="match_parent"
android:layout_height="wrap_content" >
<TableRow
android:id="@+id/tableRow1"
android:layout_width="wrap_content"
android:layout_height="wrap_content" >
<Button
android:id="@+id/button1"
android:layout_width="wrap_content"
android:layout_height="wrap_content"
android:text="Button"
android:visibility="invisible" />
<Button
android:id="@+id/start"
android:layout_width="wrap_content"
android:layout_height="wrap_content"
android:layout_marginRight="0dp"
android:text="start"
android:width="120px" />
</TableRow>
<TableRow
android:id="@+id/tableRow2"
android:layout_width="wrap_content"
android:layout_height="0dp"
android:layout_weight="1" >
<Button
android:id="@+id/left"
android:layout_width="wrap_content"
android:layout_height="wrap_content"
android:layout_marginRight="0dp"
android:text="left"
android:width="120px" />
<Button
android:id="@+id/stop"
android:layout_width="wrap_content"
android:layout_height="wrap_content"
android:text="stop"
android:width="120px" />
<Button
android:id="@+id/right"
android:layout_width="wrap_content"
android:layout_height="wrap_content"
android:text="right"
android:width="120px" />
</TableRow>
<TableRow
android:id="@+id/tableRow3"
android:layout_width="wrap_content"
android:layout_height="wrap_content" >
<Button
android:id="@+id/button2"
android:layout_width="wrap_content"
android:layout_height="wrap_content"
android:text="Button"
android:visibility="invisible" />
<Button
android:id="@+id/back"
android:layout_width="wrap_content"
android:layout_height="wrap_content"
android:text="Back" />
</TableRow>
</TableLayout>
</RelativeLayout>
</LinearLayout>
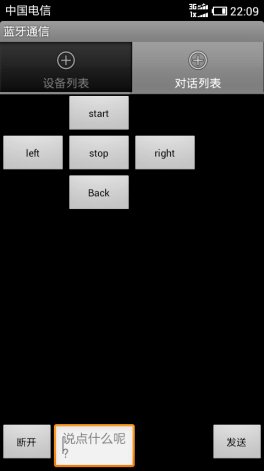
4.2.3 android客户端的界面如图4.2所示:图4.2 android控制界面
4.2.4 发送按钮的代码sendButton= (Button)findViewById(R.id.btn_msg_send);
sendButton.setOnClickListener(new OnClickListener() {
@Override
public void onClick(View arg0) {
// TODO Auto-generated method stub
String msgText =editMsgView.getText().toString();//获取编辑框内的内容
if (msgText.length()>0) {
sendMessageHandle(msgText);//发送编辑框的内容给串口
editMsgView.setText("");//清空编辑框
editMsgView.clearFocus();
//close InputMethodManager
InputMethodManager imm = (InputMethodManager)getSystemService(Context.INPUT_METHOD_SERVICE);
imm.hideSoftInputFromWindow(editMsgView.getWindowToken(), 0);
}
else
Toast.makeText(mContext, "发送内容不能为空!", Toast.LENGTH_SHORT).show();
}
});
4.2.5 控制按钮的代码以左转按钮为例:
sendButton= (Button)findViewById(R.id.left);
sendButton.setOnClickListener(new OnClickListener() {
@Override
public void onClick(View arg0) {
String msgText ="1"; // 发送左转命令“l”
if (msgText.length()>0) {
sendMessageHandle(msgText);//发送“l”给串口
editMsgView.setText("");//清空编辑框
editMsgView.clearFocus();
//close InputMethodManager
InputMethodManager imm = (InputMethodManager)getSystemService(Context.INPUT_METHOD_SERVICE);
imm.hideSoftInputFromWindow(editMsgView.getWindowToken(), 0);
}
else
Toast.makeText(mContext, "发送内容不能为空!", Toast.LENGTH_SHORT).show();
}
});
1. 系统创新自从有了智能手机,机器人的应用也就多了一个新的方向:手机控制机器人。2005年日本第二大电信运营商KDDI和机械制造商IBee KK联合推出了第一款手机控制机器人。当然了,想要操纵这种机器人,你首先需要使用KDDI网络,并且用户的手机上,本身还需要带有蓝牙功能,然后再通过KDDI提供BREW方式下载机器人的驱动程式和控制系统。不过这种机器人的价格却相对高昂,预售市价约合人民币15000元。随着Android系统技术的普及,可以做个基于Android的客户端,在小车上装个接收蓝牙信号的FBT蓝牙接收模块,然后就可以通过客户端发送蓝牙信号,来对蓝牙小车进行控制控制,其接收可达15米,完全能适应对小车的要求。其中这个FBT蓝牙接收模块是低耗能,这样就把更多的能量用在小车的驱动上。
小车需要很大的马力和很好的灵活性以应对不同的地形。这辆车的车轮使用四驱的直流电机来驱动的,用PWM波来控制小车的速度,可以很方便的更改其速度,有主控板通过推挽输出来控制电机的翻转以让车子进行后退的速度。这样就可以胜任对小车的要求。
2. 评测与结论首先,给电源模块上12v的电源,然后打开电机驱动模块开关,同时将主控板的供电端连接到电源管理模块。然后,在android手机上安装“蓝牙通信”应用程序后,打开该APP,然后选择“允许打开蓝牙”。点击设备列表中的“开始搜索按钮”,在设备列表中选择蓝牙模块的名字进行连接。
完成上述工作以后,就可以在手机上通过按下“start”、“left”、“stop”、“right”、“back”通过蓝牙给小车发送“前进”、“左转”、“停止”、“右转”、“后退”5个命令。小车可以解析命令轻松进行前进、后退、左转、右转和停止。
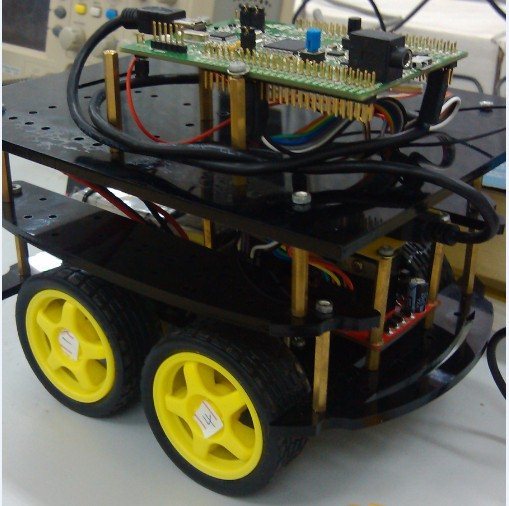
附录图6-1 作品成果1
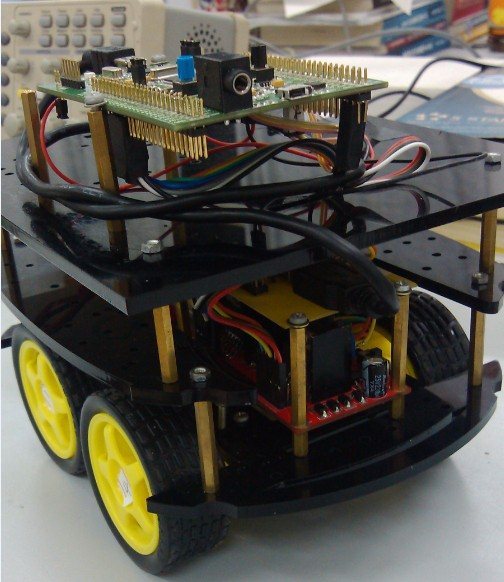
图6-2 作品成果2
全部资料51hei下载地址:
 硬件设计及文档.zip
(1.87 MB, 下载次数: 119)
硬件设计及文档.zip
(1.87 MB, 下载次数: 119)
 软件源代码及文档.rar
(639.46 KB, 下载次数: 126)
软件源代码及文档.rar
(639.46 KB, 下载次数: 126)
 基于stm32f4的蓝牙控制小车_论文.doc
(399 KB, 下载次数: 83)
基于stm32f4的蓝牙控制小车_论文.doc
(399 KB, 下载次数: 83)


 QQ好友和群
 QQ空间
QQ空间 腾讯微博
腾讯微博 腾讯朋友
腾讯朋友 收藏
收藏 淘帖
淘帖 顶
顶 踩
踩

