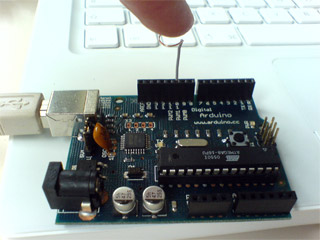
Arduino除了接受数字端口的数字信号,唯一能检测的模拟物理量就是电压。任何模拟传感器的检测值几乎都是通过相关电路转化成电压值,再输入它的模拟端口进行模数转换的。电容值就需要相对更复杂和昂贵的电路转化为电压值,才能被Arduino检测,而对很多物理过程的检测,都可以很方便可靠地通过检测电容值来实现,其中最常用的地方就是触摸传感器。现在,创客集结号为大家介绍一个除了一段导线和一个端口,不需要任何元器件的电容检测方法。
xk100com

这个方法的思路是,首先把一个数字端口设成低电位,并打开arduino的内部上拉电阻,开始计算这个端口到达高电位所需要的时间。而这个时间与此端口的对地电容值有关,电容越大,时间越长。在硬件上只需要在一个端口上连一根导线即可。用手指触摸这段导线的裸露端,就会导致电容变化,arduino可以通过上述方法检测这个变化。如果要增加灵敏度,可以在导线上连一片锡箔。为防止你手上有强静电击穿芯片,可以在锡箔上盖一层薄纸。
使用的代码如下:
int ledPin = 9;
int capval;
void setup()
{
pinMode(ledPin, OUTPUT);
Serial.begin(9600);
Serial.println("Touch senser");
}
void loop ()
{
digitalWrite(ledPin,LOW);
capval = readCapacitivePin(8);
Serial.println(capval, DEC);
if (capval > 2) {
// turn LED on:
digitalWrite(ledPin, HIGH);
delay(10);
}
}
// readCapacitivePin
// Input: Arduino pin number
// Output: A number, from 0 to 17 expressing
// how much capacitance is on the pin
// When you touch the pin, or whatever you have
// attached to it, the number will get higher
#include "pins_arduino.h" // Arduino pre-1.0 needs this
uint8_t readCapacitivePin(int pinToMeasure) {
// Variables used to translate from Arduino to AVR pin naming
volatile uint8_t* port;
volatile uint8_t* ddr;
volatile uint8_t* pin;
// Here we translate the input pin number from
// Arduino pin number to the AVR PORT, PIN, DDR,
// and which bit of those registers we care about.
byte bitmask;
port = portOutputRegister(digitalPinToPort(pinToMeasure));
ddr = portModeRegister(digitalPinToPort(pinToMeasure));
bitmask = digitalPinToBitMask(pinToMeasure);
pin = portInputRegister(digitalPinToPort(pinToMeasure));
// Discharge the pin first by setting it low and output
*port &= ~(bitmask);
*ddr |= bitmask;
delay(1);
uint8_t SREG_old = SREG; //back up the AVR Status Register
// Prevent the timer IRQ from disturbing our measurement
noInterrupts();
// Make the pin an input with the internal pull-up on
*ddr &= ~(bitmask);
*port |= bitmask;
// Now see how long the pin to get pulled up. This manual unrolling of the loop
// decreases the number of hardware cycles between each read of the pin,
// thus increasing sensitivity.
uint8_t cycles = 17;
if (*pin & bitmask) { cycles = 0;}
else if (*pin & bitmask) { cycles = 1;}
else if (*pin & bitmask) { cycles = 2;}
else if (*pin & bitmask) { cycles = 3;}
else if (*pin & bitmask) { cycles = 4;}
else if (*pin & bitmask) { cycles = 5;}
else if (*pin & bitmask) { cycles = 6;}
else if (*pin & bitmask) { cycles = 7;}
else if (*pin & bitmask) { cycles = 8;}
else if (*pin & bitmask) { cycles = 9;}
else if (*pin & bitmask) { cycles = 10;}
else if (*pin & bitmask) { cycles = 11;}
else if (*pin & bitmask) { cycles = 12;}
else if (*pin & bitmask) { cycles = 13;}
else if (*pin & bitmask) { cycles = 14;}
else if (*pin & bitmask) { cycles = 15;}
else if (*pin & bitmask) { cycles = 16;}
// End of timing-critical section; turn interrupts back on if they were on before, or leave them off if
they were off before
SREG = SREG_old;
// Discharge the pin again by setting it low and output
// It's important to leave the pins low if you want to
// be able to touch more than 1 sensor at a time - if
// the sensor is left pulled high, when you touch
// two sensors, your body will transfer the charge between
// sensors.
*port &= ~(bitmask);
*ddr |= bitmask;
return cycles;
}
若想学习更多arduino项目教程,可以搜索创客集结号或xk100。
|