|
1.introduction to stm32 The STM32 is a family of microcontroller ICs based on the 32-bit RISC ARM Cortex-M7F, Cortex-M4F, Cortex-M3, Cortex-M0+, and Cortex-M0 cores.[1]STMicroelectronics licenses the ARM Processor IP from ARM Holdings. The ARM core designs have numerous configurable options, and ST chooses the individual configuration to use for each design. ST attaches their own peripherals to the core before converting the design into a silicon die. The following tables summarize the STM32 microcontroller families. [td]Family: [xx][1][73] | Code | Core | Maxfreq[MHz] | Max FLASH [KB] | Max SRAM [KB] | Target | F0 | CortexM0 | 48 | 256 | 32 | Mainstream | F1 | CortexM3 | 72 | 1024 | 96 | Mainstream | F2 | CortexM3 | 120 | 1024 | 128 | High performance | F3 | CortexM4 | 72 | 512 | 80 | Mainstream | F4 | CortexM4 | 180 | 2048 | 384 | High performance | F7 | CortexM7 | 216 | 2048 | 512 | High performance | H7 | CortexM7 | 400 | 2048 | 1024 | High performance | L0 | CortexM0+ | 32 | 192 | 20 | Low power | L1 | CortexM3 | 32 | 512 | 80 | Low power | L4 | CortexM4 | 80 | 1024 | 320 | Low power |
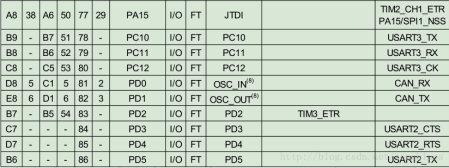
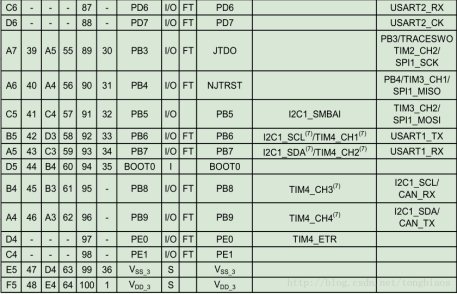
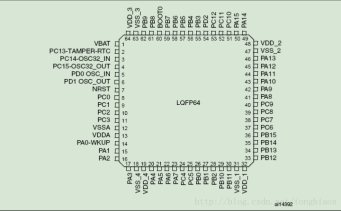
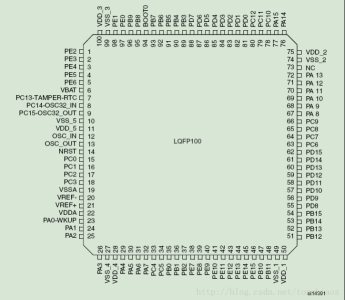
Pins for STM32F103 series
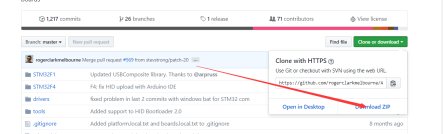
64 Pins 100Pins 144 Pins 2. How to run the IDE with STM32 Step 1: Getting ready(downloaded zip) . Download package for STM32 at http://github.com/rogerclarkmelbourne/Arduino_STM32 Then open the directory for Arduino installing ,unzip the file into the interior directory named hardware. Done all ,you’ll find STM32 series boards at the Arduino IDE: tool-->board . And choose the right one ,try to write your coding for compiling. If it works well ,greatly begin your coding . or else you may download another package using Arduino.
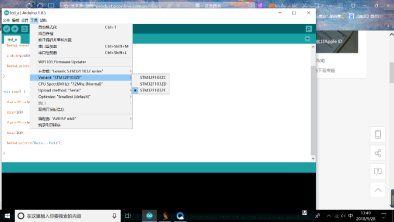
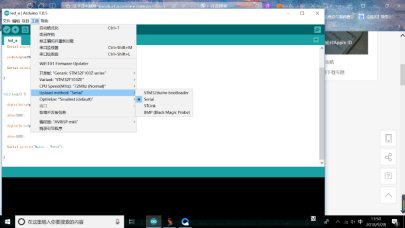
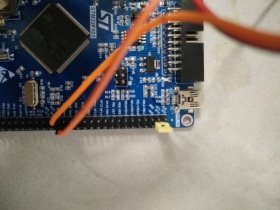
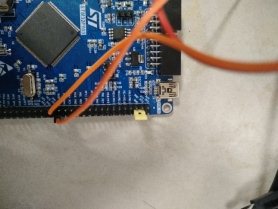
Step 2:Open Arduino,hit Tools ? Board:“board name”?Board Manager,install this file Step 3: Turn to Arduino IDE , hit Tools ? Board:“board name” ? Generic “STM32F103Z series” Tools —> Variant —> STM32F103ZE Tools —> upload method —> Serial (choose upload way) Attention !!! (On board :boot0 called BT0, boot1 called BT1, VCC called 3V3). Before loading the boot0 connect VCC pin. Reset each time you download again
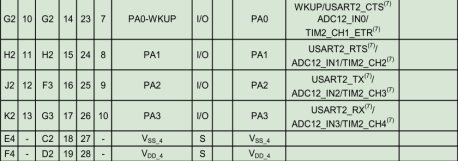
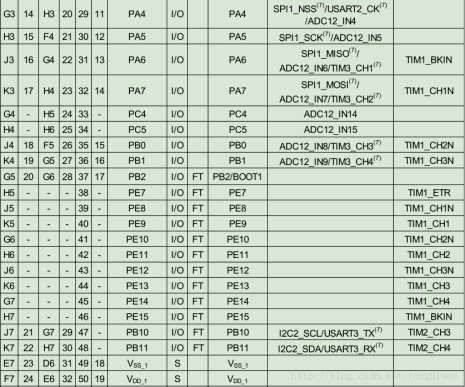
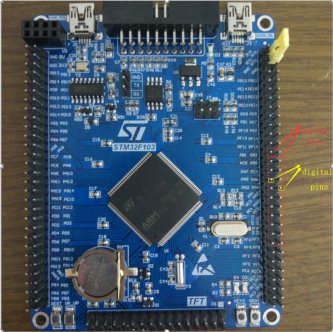
After loading the boot0 connect GND pin. Don’t care the boot1. Then it all ok. 3. Introduction to Our board Our board called STM32f10XZET6 , it has 144 pins The pin’s number of analog is 21 , and with 18 channels . STM32F103ZET6 PINS OF ANALOG | | | | | | | | | | | | | | | | | | | | | | | | | | | | | | | | | | | | | | | | | | | | | | | | | | | | | | | | | | | | | | | | | | | | | | | | | | | | |
|
|
|
|
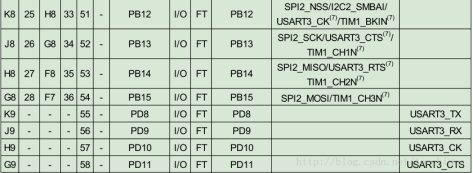
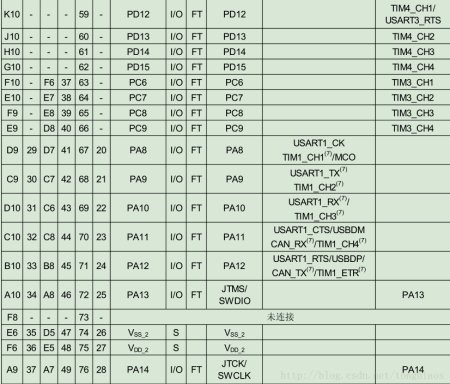
The pin’s number of digital is 2, and with 2 output channels . STM32F103ZET6 PINS OF DIGITAL | | | | |
4.sample program Step 1:Seekthe list about pins ,get your choice of pin for ADC. I get the PA3. Step 2: Begin your coding. Here will list two ways to get the pot’s voltage by ADC.
program 1:aim to : Using Analog pins to read the value of pot and output to the matched PWM.
int a, b; void setup(){ pinMode(PA3,INPUT_ANALOG); pinMode(PA6,OUTPUT); Serial.begin(9600); } void loop(){ a=analogRead(PA3); b=uint8(a*256/4096); analogWrite(PA6,b); Serial.println(a); Serial.println(b); delay(500); }
program 2:aim to : Change the package’s example to get the ADC value achieve the same function as the first. #include <STM32ADC.h> STM32ADC myADC(ADC1); uint8 pin = PA3; volatile static bool triggered = 0; uint32 dado_adc = 0,dado_out = 0; void int_func() { triggered = 1; dado_adc = myADC.getData(); dado_out=dado_adc*256/4096; analogWrite(PA6,dado_out); } void setup() { Serial.begin(19200); pinMode(PA6,OUTPUT); pinMode(D32, INPUT); pinMode(PA3, INPUT_ANALOG);//AD pin. myADC.calibrate(); myADC.setSampleRate(ADC_SMPR_1_5); myADC.attachInterrupt(int_func, ADC_EOC); myADC.setPins(&pin, 1); } void loop() { if(digitalRead(D32) == 1 ) { Serial.println("begin"); myADC.startConversion(); while (triggered == 0); //wait here... delay(500); Serial.print("Readin: "); Serial.println(dado_adc); Serial.println(dado_out); } }
About the second one , I get the example of Github’s package.
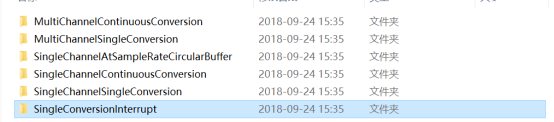
There are six Arduino projects Open the file called STM32ADC.c, I find the functions for coding . Using these API we should make some change ,like the pins .We should find the pins than we choose named PA3 .Don’t care the D23 ,D33 and so on ,you can find the at boards.h ,sojust named the pins as usual cause computer knows those .The function you can also know from the notes . To get the ADC knowledge you can seek them in internet . They will sure you better than me . You’d must know some key words ,like channel ,sample rate … and better to get how ADC work and working process.
完整的Word格式文档51黑下载地址:
 STN32ADC_Arduino_Bob.docx
(3.35 MB, 下载次数: 92)
STN32ADC_Arduino_Bob.docx
(3.35 MB, 下载次数: 92)
| 


 QQ好友和群
 QQ空间
QQ空间 腾讯微博
腾讯微博 腾讯朋友
腾讯朋友 收藏
收藏 淘帖
淘帖 顶
顶 踩
踩

