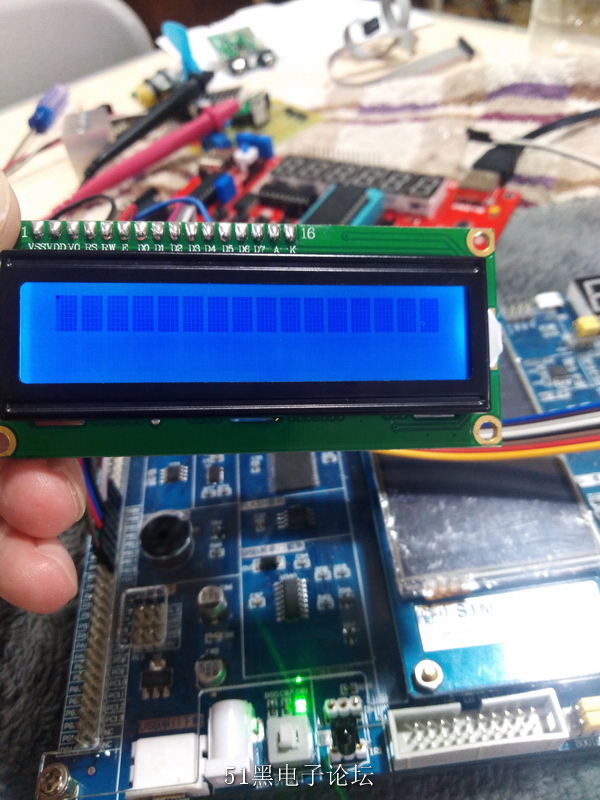
1引脚 VSS-GND(PE0)
2引脚 VDD-VCC(PE1)
3引脚 V0-GND(PE2)
4引脚 RS(PE3)
5引脚 R/W-GND(PE4) //始终写指令或数据
6引脚~14引脚(PE7~PE14)
15引脚 A-VCC(PE6)
16引脚 R-GND(PE7)
以上是我的1602显示屏引脚接在我STM32F103ZET6开发板的引脚接口。
可以驱动1602液晶显示屏亮,但是写指令和写数据,不知道有没有写进去,显示屏没有显示相应的字符。
请你指导一下。
main.c文件
- #include"stm32f10x.h"
- #include"cko.h"
- #define uint unsigned int
- #define uchar unsigned char
- uchar table[]={"I like you"}; //10
- uchar table1[]={"I favorite you"}; //14
- void delay(uint x)
- {
- uint i;
- while(x--)
- for(i=0;i<216;i++);
- }
- /*int check_busy() //¶Áæ¼ì²â
- {
- GPIO_Write(GPIOA,0xff);
- RS_CLR;
- delay(10);
- RW_SET;
- delay(10);
- do
- {
- EN_CLR;
- delay(20);
- EN_SET;
- delay(20);
- }while(GPIOA->IDR&0x80);
- return 0;
- } */
- void write_com(uint com)
- {
- // check_busy();
- RS_CLR;
- RW_CLR;
- EN_CLR;
- GPIO_Write(GPIOA,com);
- delay(10);
- EN_SET;
- delay(5);
- EN_CLR;
- }
- void write_data(uint shuju)
- {
- // check_busy();
- RS_SET;
- RW_CLR;
- EN_CLR;
- GPIO_Write(GPIOA,shuju);
- delay(10);
- EN_SET;
- delay(5);
- EN_CLR;
- }
- void init()
- {
- uint i;
- write_com(0x38);
- delay(10);
- write_com(0x01);
- delay(10);
- write_com(0x06);
- delay(10);
- write_com(0x0e);
- delay(10);
- // write_com(0x80);
- /* write_com(0x80+0x10);
- for(i=0;i<10;i++)
- {
- write_data(table[i]);
- delay(200);
- }
- write_com(0x80+0x50);
- for(i=0;i<14;i++)
- {
- write_data(table1);
- delay(200);
- }
- for(i=0;i<16;i++)
- {
- write_com(0x18);
- delay(200);
- } */
- }
- /*void write_char(uchar x,uchar y,uchar data)
- {
- if(y==0)
- {
- write_com(0x80+x);
- }
- else
- {
- write_com(0xc0+x);
- }
- write_data(data);
- delay(10);
- } */
- int main()
- {
- CKO_Init();
- init();
- // write_data('1');
- // write_char(2,0,'0');
- while(1);
- }
- cko.h文件
- #ifndef _CKO_H
- #define _CKO_H
- #include"stm32f10x.h"
- void CKO_Init(void);
- #define RS_SET GPIO_SetBits(GPIOB,GPIO_Pin_8);
- #define RS_CLR GPIO_ResetBits(GPIOB,GPIO_Pin_8);
- #define RW_SET GPIO_SetBits(GPIOB,GPIO_Pin_9);
- #define RW_CLR GPIO_ResetBits(GPIOB,GPIO_Pin_9);
- #define EN_SET GPIO_SetBits(GPIOB,GPIO_Pin_10);
- #define EN_CLR GPIO_ResetBits(GPIOB,GPIO_Pin_10);
- #endif
- cko.c文件
- #include"cko.h"
- #include"stm32f10x.h"
- void CKO_Init()
- {
- GPIO_InitTypeDef GPIO_InitStructure;
- GPIO_InitStructure.GPIO_Pin=GPIO_Pin_0|GPIO_Pin_1|GPIO_Pin_2|GPIO_Pin_3|GPIO_Pin_4|GPIO_Pin_5|GPIO_Pin_6|GPIO_Pin_7;
- GPIO_InitStructure.GPIO_Mode=GPIO_Mode_Out_PP;
- GPIO_InitStructure.GPIO_Speed=GPIO_Speed_50MHz;
-
- RCC_APB2PeriphClockCmd(RCC_APB2Periph_GPIOA, ENABLE);
- GPIO_Init(GPIOA,&GPIO_InitStructure);
- GPIO_SetBits(GPIOA,GPIO_Pin_0|GPIO_Pin_1|GPIO_Pin_2|GPIO_Pin_3|GPIO_Pin_4|GPIO_Pin_5|GPIO_Pin_6|GPIO_Pin_7);
-
- GPIO_InitStructure.GPIO_Pin=GPIO_Pin_8|GPIO_Pin_9|GPIO_Pin_10|GPIO_Pin_11|GPIO_Pin_12|GPIO_Pin_13|GPIO_Pin_14|GPIO_Pin_15;
- GPIO_InitStructure.GPIO_Mode=GPIO_Mode_Out_PP;
- GPIO_InitStructure.GPIO_Speed=GPIO_Speed_50MHz;
-
- RCC_APB2PeriphClockCmd(RCC_APB2Periph_GPIOB, ENABLE);
- GPIO_Init(GPIOB,&GPIO_InitStructure);
-
- GPIO_SetBits(GPIOB,GPIO_Pin_14|GPIO_Pin_15);
- GPIO_ResetBits(GPIOB,GPIO_Pin_12|GPIO_Pin_13|GPIO_Pin_11);
- }
赋给指令和数据的代码,在PA0~7引脚用高低电平得到了验证,代码使PA0~7引脚输出程序所写的电平,但是显示屏还是没有亮。显示屏还是如上图所示。
|