本帖最后由 laiycx 于 2020-8-13 13:06 编辑
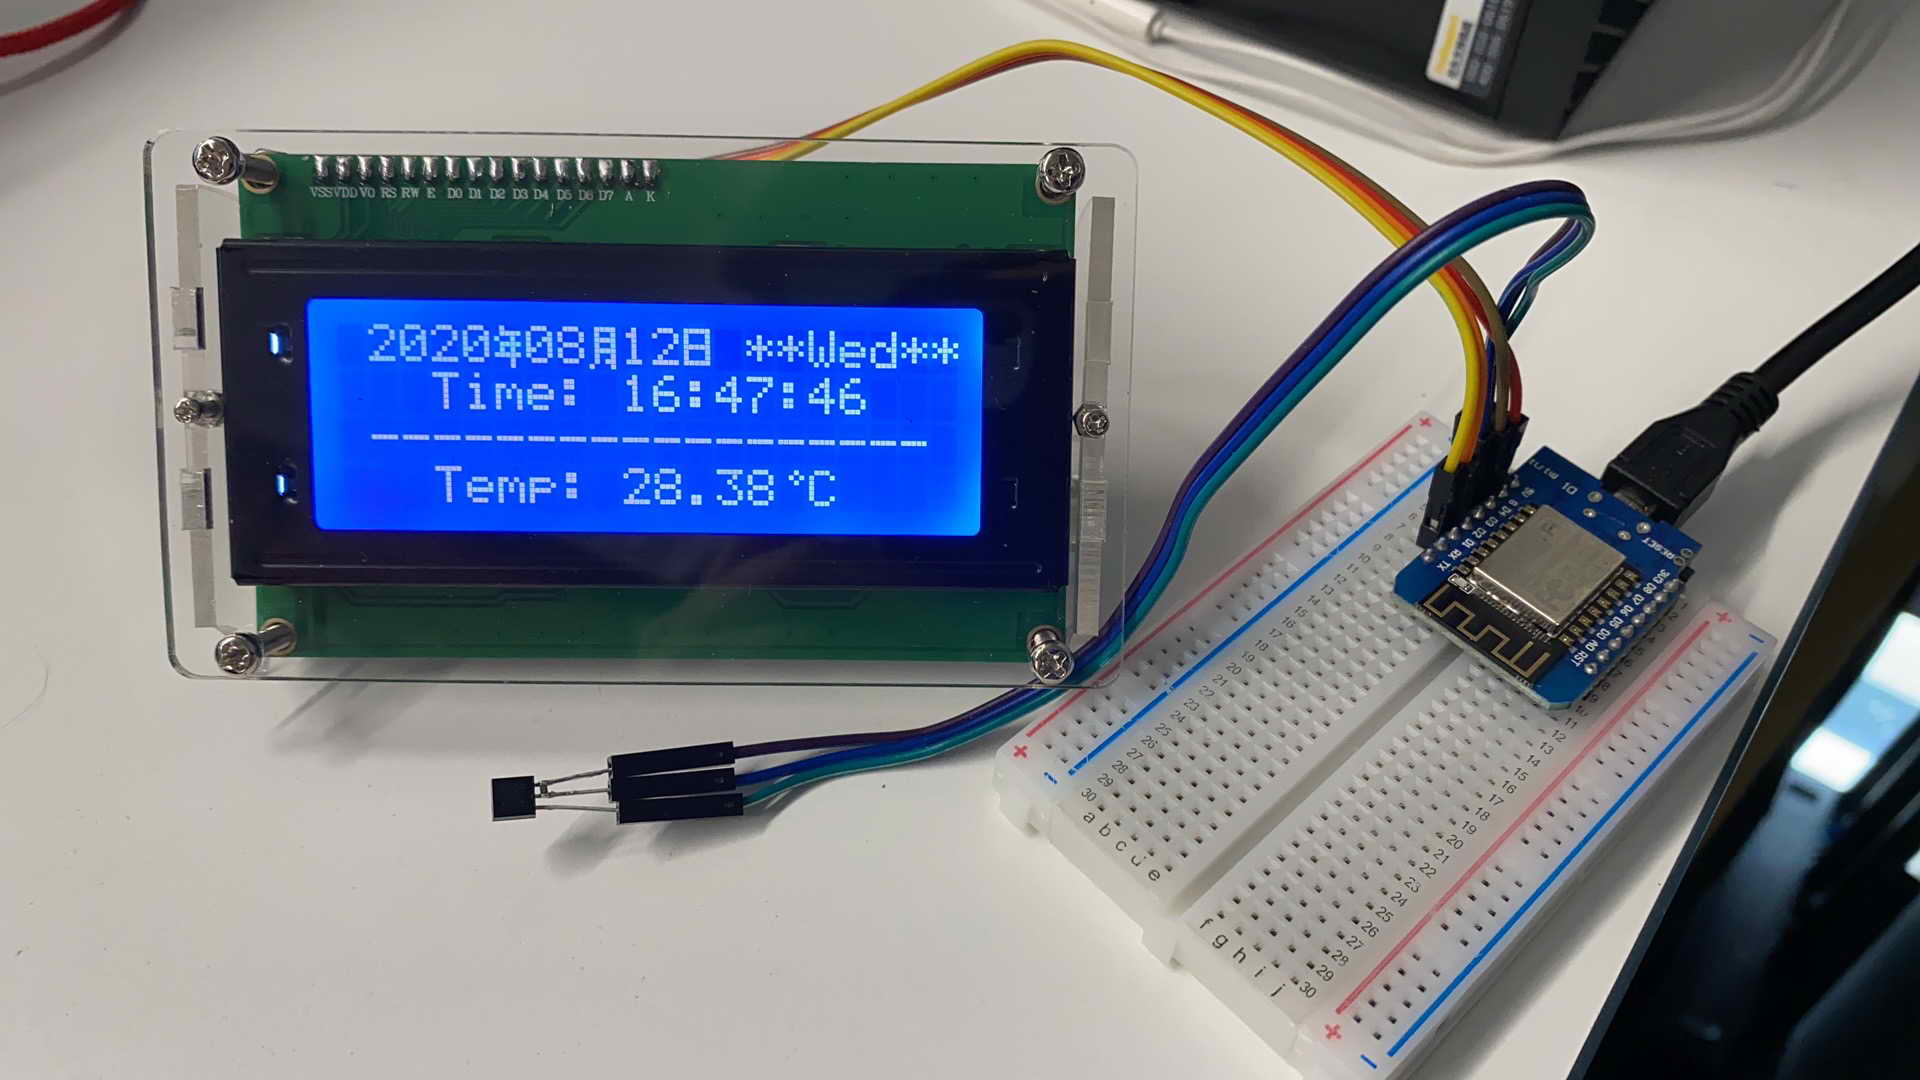
半吊子新手,程序肯定有不少可以优化的地方,请指教,谢谢
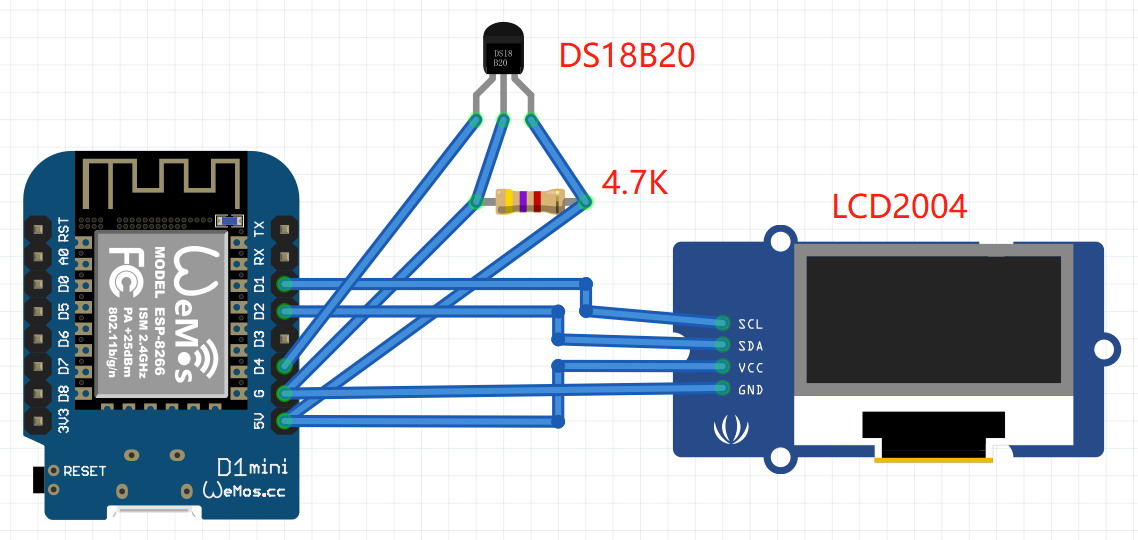
 注意:这图的BS18B20的Gnd和IO脚接到D1的时候画反了,不好意思。

- /* ---By gsmcable---
- Connect
- Arduino I2C_LCD
- 5V VCC
- GND GND
- D2 SDA SDA
- D1 SCL SCL
- D4 DS18B20
- */
- #include <ESP8266WiFi.h>
- #include <OneWire.h>
- #include <DallasTemperature.h>
- #include <WiFiUdp.h>
- #include <WiFiClientSecure.h>
- #include <NTPClient.h>
- #include <Time.h>
- #include <TimeLib.h>
- #include <Timezone.h>
- #include <Wire.h>
- #include <LiquidCrystal_I2C.h>
- LiquidCrystal_I2C lcd(0x27, 20, 4);
- #define ONE_WIRE_BUS 2 // DS18B20 pin
- OneWire oneWire(ONE_WIRE_BUS);
- DallasTemperature DS18B20(&oneWire);
- float oldTemp;
- // Define NTP properties
- #define NTP_OFFSET 60 * 60 // In seconds
- #define NTP_INTERVAL 60 * 1000 // In miliseconds
- #define NTP_ADDRESS "asia.pool.ntp.org" // change this to whatever pool is closest (see ntp.org)
- // Set up the NTP UDP client
- WiFiUDP ntpUDP;
- NTPClient timeClient(ntpUDP, NTP_ADDRESS, NTP_OFFSET, NTP_INTERVAL);
- const char* ssid = "xxx"; // insert your own ssid
- const char* password = "xxx"; // and your wifi password
- String date; //create the string for the date which will be printed on the lcd screen below
- String t; // create the string for the time
- //显示字符
- #if defined(ARDUINO) && ARDUINO >= 100
- #define printByte(args) write(args);
- #else
- #define printByte(args) print(args,BYTE);
- #endif
- //要显示的汉字编码,定义为一个数组
- uint8_t nian[8] = {0x08,0x0f,0x12,0x0f,0x0a,0x1f,0x02,0x02,};//年
- uint8_t yue[8] = {0x0f,0x09,0x0f,0x09,0x0f,0x09,0x0b,0x11,};//月
- uint8_t ri[8] = {0x1F,0x11,0x11,0x1F,0x11,0x11,0x1F,0x00,};//日
- uint8_t dian[8] = {0x02,0x05,0x02,0x00,0x00,0x00,0x00,0x00,};//点
- const char * days[] = {"Sunday", "Monday", "Tuesday", "**Wed**", "*Thurs*", "Friday", "**Sat*"} ;//my screen is 20 across to can't fit in Wednesday
- const char * months[] = {"01", "02", "03", "04", "05", "06", "07", "08", "09", "10", "11", "12"} ;
- const char * ampm[] = {"AM", "PM"} ;//not used in my version
- void setup()
- {
- Serial.begin(115200); // most D1 use 115200 but this could vary. Included for serial monitor debugging
- timeClient.begin(); // Start the NTP UDP client
- oldTemp = -1;
- int cursorPosition = 0;
- lcd.init(); // initialize the lcd
- lcd.backlight();
- lcd.setCursor(0, 0);
- lcd.print("Connect");
- lcd.setCursor(0, 2);
- lcd.print(ssid);
- // Connect to wifi
- Serial.println("");
- Serial.print("Connecting to ");
- Serial.print(ssid);
- WiFi.begin(ssid, password);
- while (WiFi.status() != WL_CONNECTED)
- {
- delay(500);
- Serial.print(".");
- }
- Serial.println("");
- Serial.print("Connected to WiFi at ");
- Serial.print(WiFi.localIP());
- Serial.println("");
- delay(1000);
- lcd.clear();
- }
- void loop()
- {
- float temp;
-
- DS18B20.requestTemperatures();
- temp = DS18B20.getTempCByIndex(0);
- Serial.print("Temperature: ");
- Serial.println(temp);
-
- //////////////////////// The first part of the loop is for the internet clock
-
- if (WiFi.status() == WL_CONNECTED) //Check WiFi connection status
- {
- date = ""; // clear the variables
- t = "";
- // update the NTP client and get the UNIX UTC timestamp
- timeClient.update();
- unsigned long epochTime = timeClient.getEpochTime();
- // convert received time stamp to time_t object
- time_t local, utc;
- utc = epochTime;
- TimeChangeRule BST = {"BST", Last, Sun, Mar, 1, 420}; //British Summer Time - change these variables for your local time
- TimeChangeRule GMT = {"GMT", Last, Sun, Oct, 2, 360}; //Standard Time
- Timezone CN(BST, GMT);
- local = CN.toLocal(utc);
- // format the time to 12-hour format with AM/PM and add seconds. t (time) is made up of the variables below which are then printed as a string
- t += hour(local);
- t += ":";
- if (minute(local) < 10) // add a zero if minute is under 10
- t += "0";
- t += minute(local);
- t += ":";
- if (second(local) < 10)
- t += "0";
- t += second(local);
- //t += ampm[isPM(local)];
- // Display the date and time
- Serial.println("");
- Serial.print("Local date: ");
- Serial.print(date);
- Serial.println("");
- Serial.print("Local time: ");
- Serial.print(t);
- lcd.createChar(1, nian);
- lcd.createChar(2, yue);
- lcd.createChar(3, ri);
- lcd.createChar(4, dian);
-
- lcd.setCursor(1, 0);
- lcd.print(year(local));
- lcd.setCursor(5, 0);
- lcd.printByte(1); //年
- lcd.setCursor(6, 0);
- lcd.print(months[month(local) - 1]);
- lcd.setCursor(8, 0);
- lcd.printByte(2); //月
- lcd.setCursor(9, 0);
- lcd.print(day(local));
- lcd.setCursor(11, 0);
- lcd.printByte(3); //日
- lcd.setCursor(13, 0);
- lcd.print(days[weekday(local) - 1]);
- lcd.setCursor(3, 1);
- lcd.print("Time:");
- lcd.setCursor(9, 1);
- lcd.print(t);
- lcd.setCursor(1, 2);
- lcd.print("------------------");
- lcd.setCursor(3, 3);
- lcd.print("Temp:");
- lcd.setCursor(9, 3);
- lcd.print(temp);
- lcd.setCursor(14, 3);
- lcd.printByte(4); //点
- lcd.setCursor(15, 3);
- lcd.print("C");
- }
- else // this part is a step to attempt to connect to wifi again if disconnected
- {
- lcd.setCursor(0, 0);
- lcd.print("Connect");
- //display.display();
- WiFi.begin(ssid, password);
- //display.drawString(0, 24, "Connected.");
- lcd.clear();
- lcd.setCursor(0, 1);
- lcd.print("Connected.");
- delay(1000);
-
- }
- }
|