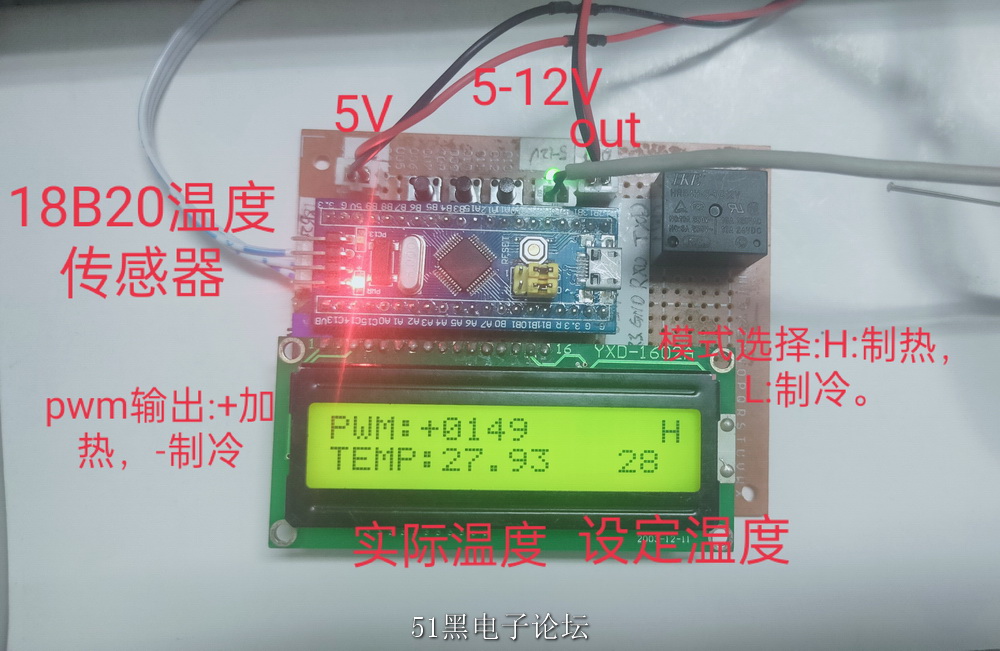
引脚说明:
//定义MCU与LCD的接口
/*******************************
*D4---->PB8
*D5---->PB5
*D6---->PB6
*D7---->PB7
*RS---->PA8
*RW---->PA11
*EN---->PA12
LCD1602
VCC---->5V
GND---->GND
VO----->接对比度调节滑动变阻器- -->GND
LED+ -->5v
LED- -->GND
PWM输出(12703半导体制冷片)
4A电机pwm驱动芯片
*制冷IN1---->PB10
*加热IN2---->PB11
18B20数字温度传感器
18B20OUT---->PB9
按键
KEY1---->PB12
KEY1---->PB13
KEY1---->PB14
AT24C16
1(A0)---->GND
2(A1)---->GND
3(A2)---->GND
4(GND)---->GND
4(SDA)---->PC13---->4.7K(R)---->VCC
6(SCL)---->PC14---->4.7K(R)---->VCC
7(WP)---->GND---->104(C)---->VCC
8(VCC)---->VCC
功能说明:通过18B20检测温度,通过pwm输出来调节控温,未进行精准pid调试,恒温时间大约在5min左右。
2021.8.25 :基本程序编写完成。
2021.8.26:修改程序,既可以制热也可以制冷。
2021.8.27:加入24c16用于存储设定温度和模式,优化lcd显示。
制作出来的实物图如下:

单片机源程序如下:
- #include "incrementpid.h"
- #include "usart.h"
- //增量式PID
- PID pid;
- u8 T_mode=1;//制冷(1)制热(0)模式切换
- void PIDParament_Init() //
- {
- pid.choose_model = MODEL_PID;//调节模式
- pid.T=500; //采样周期,定时器使用1ms,则最小执行PID的周期为500ms
- pid.set =25; //用户设定值,摄氏度
- pid.Kp=0.6; //比例系数
- pid.Ti=100.0; //微分系数常数ms
- pid.Td=20.0; //积分时间常数ms
- pid.OUT0=0; //一个维持的输出
- pid.pwmcycle = 1999; //PWM的周期
- }
-
- void pid_calc() //增量式PID调节函数
- {
- float dk1;float dk2;
- float t1,t2,t3;
-
- if(pid.Tdata < (pid.T)) //最小计算周期未到
- {
- return ;
- }
- pid.Tdata = 0;
-
- pid.En=pid.set-pid.curr; //本次误差
- dk1=pid.En-pid.En_1; //本次偏差与上次偏差之差
- dk2=pid.En-2*pid.En_1+pid.En_2;
-
- t1=pid.Kp*dk1; //比例
-
- t2=(pid.Kp*pid.T)/pid.Ti; //积分
- t2=t2*pid.En;
-
- t3=(pid.Kp*pid.Td)/pid.T; //微分
- t3=t3*dk2;
-
- switch(pid.choose_model)
- {
- case MODEL_P: pid.Dout= t1; printf("使用P运算\r\n") ;
- break;
-
- case MODEL_PI: pid.Dout= t1+t2; printf("使用PI运算\r\n") ;
- break;
-
- case MODEL_PID: pid.Dout= t1+t2+t3; printf("使用PID运算\r\n") ;
- break;
- }
-
-
-
-
- if(T_mode==0)//制热PID调节
- {
- pid.currpwm+=pid.Dout; //本次应该输出的PWM
- printf("PID算得的OUT:\t%d\r\n",(int)pid.currpwm) ;
-
- /*判断算出的数是否符合控制要求*/
- if(pid.currpwm>pid.pwmcycle) //算出的值取值,肯定是在0-pid.pwmcycle之间,不然的话PWM怎么输出
- {
- pid.currpwm=pid.pwmcycle;
- }
- if(pid.currpwm<0)
- {
- pid.currpwm=0;
- }
- TIM_SetCompare4(TIM2,pid.currpwm); //pwm输出函数
- TIM_SetCompare3(TIM2,0); //pwm输出函数
- printf("实际输出使用的OUT:\t%d\r\n",(int)pid.currpwm) ;
- }
- else if(T_mode==1)//制冷PID调节
- {
- pid.currpwm+=pid.Dout; //本次应该输出的PWM
-
- printf("PID算得的OUT:\t%d\r\n",(int)pid.currpwm) ;
-
-
- if(-pid.currpwm>pid.pwmcycle)//算出的值取值,肯定是在0-pid.pwmcycle之间,不然的话PWM怎么输出
- {
- pid.currpwm=-pid.pwmcycle; //pwm最大宽度
-
- }
- if(pid.currpwm>0)//当前的pwm宽度
- {
- pid.currpwm=0;
-
- }
- TIM_SetCompare3(TIM2,-pid.currpwm); //pwm输出函数
- TIM_SetCompare4(TIM2,0);
- printf("实际输出使用的OUT:\t%d\r\n",(int)pid.currpwm) ;
- }
-
- pid.En_2=pid.En_1;
- pid.En_1=pid.En;
- }
- #include <stdlib.h>
- #include <stdio.h>
- #include <string.h>
- #include <math.h>
- #include "sys.h"
- #include "delay.h"
- #include "usart.h"
- #include "ds18b20.h"
- #include "LCD1602.h"
- #include "pwmout.h"
- #include "key.h"
- #include "timer3.h"
- #include "incrementpid.h"
- #include "24cxx.h"
- //float TM1;//存储温度值
- //s8 set_temp=30;//设定温度
- uint8_t ucDs18b20Id[8];//存储18b20数据
- u8 i;//循环读取18b20ID次数
- u8 a,b,c=0;//lcd循环显示
- u16 pwmval23=0,pwmval24=0;//占空比调节
- u8 cle_pwm1,cle_pwm2;//清除pwm显示
- int main(void)
- {
- delay_init(); //延时函数初始化
- NVIC_PriorityGroupConfig(NVIC_PriorityGroup_2); //设置NVIC中断分组2:2位抢占优先级,2位响应优先级
- uart_init(9600); //串口初始化为9600
- LCD_init();//lcd1206初始化
- PWM_Out_Init(); // 定时器输出pwm初始化
- KEY_Input_Init();//GPIO IN初始化
- TIM3_Init(999,71); ////TIM2 1ms中断
- PIDParament_Init() ;//增量式PID初始化
- AT24CXX_Init();//初始化IIC接口
-
-
- TIM_SetCompare3(TIM2,0); //pwm输出函数
- TIM_SetCompare4(TIM2,0); //pwm输出函数
-
- LCD_set_xy(1,2);//写位置
- LCD_write_data('T'); //写数据
- LCD_write_data('E'); //写数据
- LCD_write_data('M'); //写数据
- LCD_write_data('P'); //写数据
- LCD_write_data(':'); //写数据
- LCD_set_xy(1,1);//写位置
- LCD_write_data('P'); //写数据
- LCD_write_data('W'); //写数据
- LCD_write_data('M'); //写数据
- LCD_write_data(':'); //写数据
- while( DS18B20_Init() ) //DS18B20初始化
- {
- printf("no ds18b20 exit\r\n");//初始化DS18B20,不初始化就等待这里?
- delay_ms(500);
- break;
- }
- DS18B20_ReadId(ucDs18b20Id); //读取18b20的ID
- //LCD_write_cmd(0x0f);//写命令
- for(i = 0;i < 8;i ++)
- {
- printf("DS18B20[%d] ID:%d \r\n ",i,ucDs18b20Id[i]); //读取18b20的ID
- }
-
- while(AT24CXX_Check())//检测不到24c02
- {
- printf("检测不到24cXX\r\n") ;
- delay_ms(1000);
- break;
- }
-
- pid.set=AT24CXX_ReadOneByte_minus(0);//设定温度数据读取,在AT24CXX指定地址读出一个数据
- T_mode=AT24CXX_ReadOneByte(4);//模式数据读取,在AT24CXX指定地址读出一个数据
-
- while(1)
- {
- /************************温度设定*****************************************/
-
- if( KEY_Scan(0,KEY1)){pid.set++;AT24CXX_WriteOneByte_minus(0,pid.set);/*在AT24CXX指定地址写入一个数据*/}
- if( pid.set>125)pid.set=125;
-
- if( KEY_Scan(0,KEY2)){T_mode=!T_mode;AT24CXX_WriteOneByte(4,T_mode);/*在AT24CXX指定地址写入一个数据*/}//制冷制热模式切换
-
- if( KEY_Scan(0,KEY3)){pid.set--;AT24CXX_WriteOneByte_minus(0,pid.set);/*在AT24CXX指定地址写入一个数据*/}
- if( pid.set<-55)pid.set=-55;
- /********************pwm输出**********************************************/
-
- pid_calc() ;//增量式PID调节函数
-
- /*********************制冷制热模式显示****************************/
- LCD_set_xy(16,1);//写位置
- if(T_mode==1)//制冷
- {
- LCD_write_data('L'); //写数据
- cle_pwm1=1;
-
- }
- else//制热
- {
- LCD_write_data('H'); //写数据
- cle_pwm2=1;
- }
-
- if(cle_pwm1&&cle_pwm2)
- {
- LCD_set_xy(5,1);//写位置
- LCD_write_data(' '); //写数据
- LCD_write_data('0'); //写数据
- LCD_write_data('0'); //写数据
- LCD_write_data('0'); //写数据
- LCD_write_data('0'); //写数据
- cle_pwm1=0;
- cle_pwm2=0;
- }
- /*********************pwm输出显示在lcd1602上****************************/
-
- //if(pid.currpwm<0)//制冷
- if(T_mode==1)//制冷
- {
- pwmval23=-pid.currpwm;
- memset(Data_Partition,0x30,sizeof(Data_Partition));//初始化数组
- conversion(pwmval23);//将数据拆分方便写入lcd1602
- LCD_set_xy(5,1);//写位置
- LCD_write_data('-'); //写数据
- LCD_write_data(Data_Partition[3]); //写数据
- LCD_write_data(Data_Partition[2]); //写数据
- LCD_write_data(Data_Partition[1]); //写数据
- LCD_write_data(Data_Partition[0]); //写数据
-
- }
-
- //else if(pid.currpwm>0)//制热
- else if(T_mode==0)//制冷
- {
- pwmval24=pid.currpwm;
- memset(Data_Partition,0x30,sizeof(Data_Partition));//初始化数组0x30 LCD的字符0
- conversion(pwmval24);//将数据拆分方便写入lcd1602
- LCD_set_xy(5,1);//写位置
- LCD_write_data('+'); //写数据
- LCD_write_data(Data_Partition[3]); //写数据
- LCD_write_data(Data_Partition[2]); //写数据
- LCD_write_data(Data_Partition[1]); //写数据
- LCD_write_data(Data_Partition[0]); //写数据
-
- }
-
- /*****************设定温度显示在lcd1602上********************************/
-
- if(pid.set>=0) //lcd1602显示设定温度
- {
- b=Data_Line(pid.set);//获取显示数据位数
- conversion(pid.set);//将数据拆分方便写入lcd1602
-
- LCD_set_xy(13,2);//写位置
- LCD_write_data(' '); //清除“-” 号
-
- LCD_set_xy(14,2);//写位置
- for(a=0;a<b+1;a++) //清空显示数据
- {
- LCD_write_data(' '); //写数据
- }
-
- LCD_set_xy(14,2);//写位置
- for(a=0;a<b;a++) //整数部分显示,不限长度
- {
- LCD_write_data(Data_Partition[b-a-1]); //写数据
- }
- }
-
- /****************************************************************/
- else if(pid.set<0) //lcd1602显示设定温度
- {
- b=Data_Line(-pid.set);//获取显示数据位数
- conversion(-pid.set);//将数据拆分方便写入lcd1602
-
- LCD_set_xy(13,2);//写位置
- LCD_write_data('-'); //显示“-” 号
-
- LCD_set_xy(14,2);//写位置
- for(a=0;a<b+1;a++) //清空显示数据
- {
- LCD_write_data(' '); //写数据
- }
-
- LCD_set_xy(14,2);//写位置
- for(a=0;a<b;a++) //整数部分显示,不限长度
- {
- LCD_write_data(Data_Partition[b-a-1]); //写数据
- }
-
- }
-
- /**************************温度显示在lcd1602*****************************************/
-
- pid.curr=DS18B20_GetTemp_MatchRom ( ucDs18b20Id ); //读取18b20温度数据
- if(pid.curr>=0) //lcd1602显示温度
- {
-
- b=Data_Line(pid.curr*100);//获取显示数据位数
- conversion(pid.curr*100);//将数据拆分方便写入lcd1602
- // LCD_set_xy(6,2);//写位置
- // for(a=0;a<b+2;a++) //清空显示数据
- // {
- // LCD_write_data(' '); //写数据
- // }
-
- LCD_set_xy(6,2);//写位置
- for(a=0;a<b-2;a++) //整数部分显示,不限长度
- {
- LCD_write_data(Data_Partition[b-a-1]); //写数据
- }
- if(pid.curr<1)
- {
- LCD_write_data('0'); //写数据
- }
- LCD_write_data('.'); //写数据
-
- for(a=2;a>0;a--) //小数部分显示
- {
- LCD_write_data(Data_Partition[a-1]); //写数据
- }
- }
- /******************************************************************************/
- else if(pid.curr<0) //lcd1602显示温度
- {
- ……………………
- …………限于本文篇幅 余下代码请从51黑下载附件…………
代码工程51hei附件下载:
 PID控制-STM32F103C8T6 控温.7z
(210.66 KB, 下载次数: 217)
|