
刚学单片机的时候做的一个智能小车,现在把当时的一些资料整理了一下,希望对刚入门的童鞋有帮助!
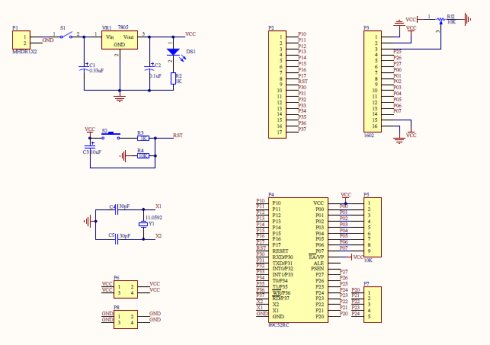
1、下图为单片机的最小系统,可以自己用万用板焊接,顺便练练焊接能力也不错的。本设计采用了51单片机,网上关于51单片机的资料有一大堆,大伙可以从它来入门,推荐郭天祥的视频(我就是跟着他学的),讲的挺详细的。
 )。
)。
4、下面我把源代码贴出来,感兴趣的童鞋可以看看希望有豪帮助!
- 以下是“CarDrive.c”文件中的源程序:
#include "CarDrive.h"
//左电机正转
void LeftMotorCorotation(void)
{
LeftMotor_1 = 1;
LeftMotor_2 = 0;
}
//左电机反转
void LeftMotorRollback(void)
{
LeftMotor_1 = 0;
LeftMotor_2 = 1;
}
//右电机正转
void RightMotorCorotation(void)
{
RightMotor_1 = 1;
RightMotor_2 = 0;
}
//右电机反转
void RightMotorRollback(void)
{
RightMotor_1 = 0;
RightMotor_2 = 1;
}
//小车前进
void CarGoAhead(void)
{
LeftMotorCorotation();
RightMotorRollback();
}
//小车慢速左拐
void CarTurnLeft_Low(void)
{
LeftMotor_1 = 0;
LeftMotor_2 = 0;
RightMotorRollback();
}
//小车慢速右拐
void CarTurnRight_Low(void)
{
RightMotor_1 = 0;
RightMotor_2 = 0;
LeftMotorCorotation();
}
//小车快速左拐
void CarTurnLeft_High(void)
{
LeftMotorRollback();
RightMotorRollback();
}
//小车快速右拐
void CarTurnRight_High(void)
{
LeftMotorCorotation();
RightMotorCorotation();
}
//小车道路判断
void CarRoadJudge(void)
{
if(LeftPhotoelectricCell_1&&(!LeftPhotoelectricCell_2)&&(!RightPhotoelectricCell_2)&&RightPhotoelectricCell_1)
CarGoAhead();
if(LeftPhotoelectricCell_1&&(!LeftPhotoelectricCell_2)&&RightPhotoelectricCell_2&&RightPhotoelectricCell_1)
CarGoAhead();
if(LeftPhotoelectricCell_1&&LeftPhotoelectricCell_2&&(!RightPhotoelectricCell_2)&&RightPhotoelectricCell_1)
CarGoAhead();
if((!LeftPhotoelectricCell_1)&&(!LeftPhotoelectricCell_2)&&RightPhotoelectricCell_2&&RightPhotoelectricCell_1)
CarTurnLeft_Low();
if(LeftPhotoelectricCell_1&&LeftPhotoelectricCell_2&&(!RightPhotoelectricCell_2)&&(!RightPhotoelectricCell_1))
CarTurnRight_Low();
if((!LeftPhotoelectricCell_1)&&LeftPhotoelectricCell_2&&RightPhotoelectricCell_2&&RightPhotoelectricCell_1)
CarTurnLeft_High();
if(LeftPhotoelectricCell_1&&LeftPhotoelectricCell_2&&RightPhotoelectricCell_2&&(!RightPhotoelectricCell_1))
CarTurnRight_High();
if(LeftPhotoelectricCell_1&&LeftPhotoelectricCell_2&&RightPhotoelectricCell_2&&RightPhotoelectricCell_1)
//CarTurnRight_Low();
CarGoAhead();
if((!LeftPhotoelectricCell_1)&&(!LeftPhotoelectricCell_2)&&(!RightPhotoelectricCell_2)&&(!RightPhotoelectricCell_1))
CarGoAhead();
}
- 以下是“CarDrive.h”文件中的源程序:
#ifndef _CarDrive_H_
#define _CarDrive_H_
#include
#define uint unsigned int
#define uchar unsigned char
sbit LeftMotor_1 = P0^0;
sbit LeftMotor_2 = P0^1;
sbit RightMotor_1 = P0^2;
sbit RightMotor_2 = P0^3;
sbit LeftPhotoelectricCell_1
sbit LeftPhotoelectricCell_2
sbit RightPhotoelectricCell_2
sbit RightPhotoelectricCell_1
void CarGoAhead(void);
//void CarBackOff(void);
void CarTurnLeft_Low(void);
void CarTurnRight_Low(void);
void CarTurnLeft_High(void);
void CarTurnRight_High(void);
//void CarBrake(void);
void CarRoadJudge(void);
#endif
- 以下是“main.h”中的程序:
#ifndef _main_H_
#define _main_H_
#include
#include "CarDrive.h"
#define uint unsigned int
#define uchar unsigned char
#endif
- 以下是“main.c”中的程序:
#include "main.h"
void main(void)
{
while(1)
{
CarRoadJudge();
}
}
5、下面是小车的视频
总结:好了,电路图、程序源码、视频都在这了,大家多动手才是,最后感谢童鞋们花费宝贵的时间来浏览我的博客,我是“香莲清风”咱们下次见!