专注电子技术学习与研究
当前位置:单片机教程网 >> MCU设计实例 >> 浏览文章

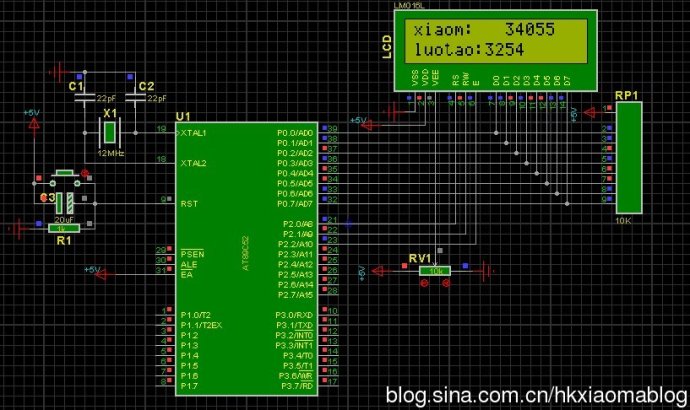
基于51单片机1602库+显示函数(已验证)

作者:hkxiaoma   来源:互联网   点击数:  更新时间:2014年07月29日   【字体:


LCD1602.c

#include<reg52.h>
#include "LCD1602.h"

unsigned char TempBuffer[10];
/////////////////////////////////////////////////////
//////////////////五位数字显示转换///////////////////
/////////////////////////////////////////////////////
void IntToStr(unsigned int t, unsigned char *str, unsigned char n)
{
 unsigned char a[5]; char i, j;                                  
 a[0]=(t/10000);         //取得整数值到数组          
 a[1]=(t/1000);                                      
 a[2]=(t/100);                                       
 a[3]=(t/10);                                        
 a[4]=(t/1);                                         
                                                     
 for(i=0; i<5; i++)         //转成ASCII码               
  a[i]=a[i]+'0';                                     
 for(i=0; a[i]=='0' && i<=3; i++);                      
 for(j=5-n; j
  { *str=' ';  str++; }                              
 for(; i<5; i++)                                        
  { *str=a[i]; str++; }  //加入有效的数字            
 *str='\0';
}
 
void Delay1ms(unsigned int count)
{
 unsigned int i,j;
 for(i=0;i
 for(j=0;j<120;j++);
}

main()
{
 unsigned int Count = 0,ab;
 LCD_Initial();
 GotoXY(0,0);
 Print("xiaom:");
 GotoXY(0,1);//0表示次数字节长度不限制  1表示第二行
 Print("luotao:         ");
 Count=32277767;ab=3254;
 while(1)
 {
  IntToStr(Count,&TempBuffer[0],8);//8表示此处数字长度为8位数
  GotoXY(6,0);//6表示此处数字长度为6位
  Print(&TempBuffer[0]);
  IntToStr(ab,&TempBuffer[0],3);
  GotoXY(7,1);
  Print(&TempBuffer[0]);
  Delay1ms(100);
 }
}


LCD1602.h

#ifndef LCD_CHAR_1602_2005_4_9
#define LCD_CHAR_1602_2005_4_9

#include

//Port Definitions**********************************************************
sbit LcdRs  = P2^0;
sbit LcdRw  = P2^1;
sbit LcdEn   = P2^2;
sfr  DBPort  = 0x80;  //P0=0x80,P1=0x90,P2=0xA0,P3=0xB0.数据端口

//内部等待函数**************************************************************************
unsigned char LCD_Wait(void)
{
 LcdRs=0;
 LcdRw=1; _nop_();
 LcdEn=1; _nop_();
 //while(DBPort&0x80);//在用Proteus仿真时,注意用屏蔽此语句,在调用GotoXY()时,会进入死循环,
       //可能在写该控制字时,该模块没有返回写入完备命令,即DBPort&0x80==0x80
       //实际硬件时打开此语句
 LcdEn=0;
 return DBPort;  
}
//向LCD写入命令或数据************************************************************
#define LCD_COMMAND        // Command
#define LCD_DATA        // Data
#define LCD_CLEAR_SCREEN 0x01      // 清屏
#define LCD_HOMING    0x02      // 光标返回原点
void LCD_Write(bit style, unsigned char input)
{
 LcdEn=0;
 LcdRs=style;
 LcdRw=0;  _nop_();
 DBPort=input; _nop_();//注意顺序
 LcdEn=1;  _nop_();//注意顺序
 LcdEn=0;  _nop_();
 LCD_Wait(); 
}

//设置显示模式************************************************************
#define LCD_SHOW   0x04    //显示开
#define LCD_HIDE   0x00    //显示关  

#define LCD_CURSOR   0x02  //显示光标
#define LCD_NO_CURSOR  0x00    //无光标      

#define LCD_FLASH   0x01    //光标闪动
#define LCD_NO_FLASH  0x00    //光标不闪动

void LCD_SetDisplay(unsigned char DisplayMode)
{
 LCD_Write(LCD_COMMAND, 0x08|DisplayMode); 
}

//设置输入模式************************************************************
#define LCD_AC_UP   0x02
#define LCD_AC_DOWN   0x00      // default

#define LCD_MOVE   0x01      // 画面可平移
#define LCD_NO_MOVE   0x00      //default

void LCD_SetInput(unsigned char InputMode)
{
 LCD_Write(LCD_COMMAND, 0x04|InputMode);
}

//移动光标或屏幕************************************************************

//初始化LCD************************************************************
void LCD_Initial()
{
 LcdEn=0;
 LCD_Write(LCD_COMMAND,0x38);           //8位数据端口,2行显示,5*7点阵
 LCD_Write(LCD_COMMAND,0x38);
 LCD_SetDisplay(LCD_SHOW|LCD_NO_CURSOR);    //开启显示, 无光标
 LCD_Write(LCD_COMMAND,LCD_CLEAR_SCREEN);   //清屏
 LCD_SetInput(LCD_AC_UP|LCD_NO_MOVE);       //AC递增, 画面不动
}

/
//************************************************************************
#endif

关闭窗口

相关文章