找回密码
 立即注册

QQ登录

只需一步,快速开始

搜索
查看: 17035|回复: 10
打印 上一主题 下一主题
收起左侧

Arduino学习3-Arduino连接HMC5883L三轴电子罗盘传感器

  [复制链接]
跳转到指定楼层
楼主
用途:测量地磁方向,测量物体静止时候的方向,测量传感器周围磁力线的方向。注意,测量地磁时候容易受到周围磁场影响,

主芯片HMC5883三轴磁阻传感器特点(抄自网上):
1,数字量输出:I2C数字量输出接口,设计使用非常方便。
2,尺寸小: 3x3x0.9mm LCC封装,适合大规模量产使用。
3,精度高:1-2度,内置12位A/D,OFFSET, SET/RESET 电路,不会出现磁饱和现象,不会有累加误差。
4,支持自动校准程序,简化使用步骤,终端产品使用非常方便。
5,内置自测试电路,方便量产测试,无需增加额外昂贵的测试设备。
6,功耗低:供电电压1.8V, 功耗睡眠模式-2.5uA 测量模式-0.6mA
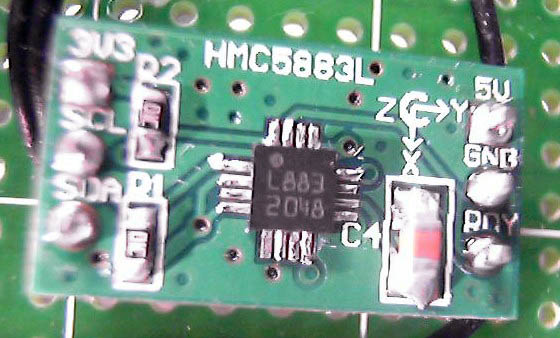


连接方法:
只要连接VCC,GND,SDA,SCL四条线。Arduino GND -> HMC5883L GNDArduino 3.3V -> HMC5883L VCCArduino A4 (SDA) -> HMC5883L SDAArduino A5 (SCL) -> HMC5883L SCL

(注意,接线是A4,A5,不是D4,D5)


程序编写:下载HMC5883L库文件。下载地址: HMC5883L.zip (5.55 KB, 下载次数: 100) 主要程序预览:
  1. /*
  2. HMC5883L.cpp - Class file for the HMC5883L Triple Axis Magnetometer Arduino Library.
  3. Copyright (C) 2011 Love Electronics (loveelectronics.co.uk)

  4. This program is free software: you can redistribute it and/or modify
  5. it under the terms of the version 3 GNU General Public License as
  6. published by the Free Software Foundation.

  7. This program is distributed in the hope that it will be useful,
  8. but WITHOUT ANY WARRANTY; without even the implied warranty of
  9. MERCHANTABILITY or FITNESS FOR A PARTICULAR PURPOSE.  See the
  10. GNU General Public License for more details.

  11. You should have received a copy of the GNU General Public License
  12. along with this program.  If not, see .

  13. WARNING: THE HMC5883L IS NOT IDENTICAL TO THE HMC5883!

  14. */

  15. #include  
  16. #include "HMC5883L.h"

  17. HMC5883L::HMC5883L()
  18. {
  19.   m_Scale = 1;
  20. }

  21. MagnetometerRaw HMC5883L::ReadRawAxis()
  22. {
  23.   uint8_t* buffer = Read(DataRegisterBegin, 6);
  24.   MagnetometerRaw raw = MagnetometerRaw();
  25.   raw.XAxis = (buffer[0] << 8) | buffer[1];
  26.   raw.ZAxis = (buffer[2] << 8) | buffer[3];
  27.   raw.YAxis = (buffer[4] << 8) | buffer[5];
  28.   return raw;
  29. }

  30. MagnetometerScaled HMC5883L::ReadScaledAxis()
  31. {
  32.   MagnetometerRaw raw = ReadRawAxis();
  33.   MagnetometerScaled scaled = MagnetometerScaled();
  34.   scaled.XAxis = raw.XAxis * m_Scale;
  35.   scaled.ZAxis = raw.ZAxis * m_Scale;
  36.   scaled.YAxis = raw.YAxis * m_Scale;
  37.   return scaled;
  38. }

  39. int HMC5883L::SetScale(float gauss)
  40. {
  41.         uint8_t regValue = 0x00;
  42.         if(gauss == 0.88)
  43.         {
  44.                 regValue = 0x00;
  45.                 m_Scale = 0.73;
  46.         }
  47.         else if(gauss == 1.3)
  48.         {
  49.                 regValue = 0x01;
  50.                 m_Scale = 0.92;
  51.         }
  52.         else if(gauss == 1.9)
  53.         {
  54.                 regValue = 0x02;
  55.                 m_Scale = 1.22;
  56.         }
  57.         else if(gauss == 2.5)
  58.         {
  59.                 regValue = 0x03;
  60.                 m_Scale = 1.52;
  61.         }
  62.         else if(gauss == 4.0)
  63.         {
  64.                 regValue = 0x04;
  65.                 m_Scale = 2.27;
  66.         }
  67.         else if(gauss == 4.7)
  68.         {
  69.                 regValue = 0x05;
  70.                 m_Scale = 2.56;
  71.         }
  72.         else if(gauss == 5.6)
  73.         {
  74.                 regValue = 0x06;
  75.                 m_Scale = 3.03;
  76.         }
  77.         else if(gauss == 8.1)
  78.         {
  79.                 regValue = 0x07;
  80.                 m_Scale = 4.35;
  81.         }
  82.         else
  83.                 return ErrorCode_1_Num;
  84.         
  85.         // Setting is in the top 3 bits of the register.
  86.         regValue = regValue << 5;
  87.         Write(ConfigurationRegisterB, regValue);
  88. }

  89. int HMC5883L::SetMeasurementMode(uint8_t mode)
  90. {
  91.         Write(ModeRegister, mode);
  92. }

  93. void HMC5883L::Write(int address, int data)
  94. {
  95.   Wire.beginTransmission(HMC5883L_Address);
  96.   Wire.send(address);
  97.   Wire.send(data);
  98.   Wire.endTransmission();
  99. }

  100. uint8_t* HMC5883L::Read(int address, int length)
  101. {
  102.   Wire.beginTransmission(HMC5883L_Address);
  103.   Wire.send(address);
  104.   Wire.endTransmission();
  105.   
  106.   Wire.beginTransmission(HMC5883L_Address);
  107.   Wire.requestFrom(HMC5883L_Address, length);

  108.   uint8_t buffer[length];
  109.   if(Wire.available() == length)
  110.   {
  111.           for(uint8_t i = 0; i < length; i++)
  112.           {
  113.                   buffer[i] = Wire.receive();
  114.           }
  115.   }
  116.   Wire.endTransmission();

  117.   return buffer;
  118. }

  119. char* HMC5883L::GetErrorText(int errorCode)
  120. {
  121.         if(ErrorCode_1_Num == 1)
  122.                 return ErrorCode_1;
  123.         
  124.         return "Error not defined.";
  125. }
复制代码


解压HMC5883L库文件到arduino文件夹:arduino-0022libraries下面。编写以下程序,下载下面测试程序到arduino:
#include <Wire.h>
#include <HMC5883L.h>
HMC5883L compass;
void setup()
{
  Serial.begin(9600);
  Wire.begin();
  compass = HMC5883L();
  compass.SetScale(1.3);
  compass.SetMeasurementMode(Measurement_Continuous);
}
void loop()
{
  MagnetometerRaw raw = compass.ReadRawAxis();
  MagnetometerScaled scaled = compass.ReadScaledAxis();
  float xHeading = atan2(scaled.YAxis, scaled.XAxis);
  float yHeading = atan2(scaled.ZAxis, scaled.XAxis);
  float zHeading = atan2(scaled.ZAxis, scaled.YAxis);
  if(xHeading < 0) xHeading += 2*PI;
  if(xHeading > 2*PI) xHeading -= 2*PI;
  if(yHeading < 0) yHeading += 2*PI;
  if(yHeading > 2*PI) yHeading -= 2*PI;
  if(zHeading < 0) zHeading += 2*PI;
  if(zHeading > 2*PI) zHeading -= 2*PI;
  float xDegrees = xHeading * 180/M_PI;
  float yDegrees = yHeading * 180/M_PI;
  float zDegrees = zHeading * 180/M_PI;
  Serial.print(xDegrees);
  Serial.print(",");
  Serial.print(yDegrees);
  Serial.print(",");
  Serial.print(zDegrees);
  Serial.println(";");
  delay(100);
}

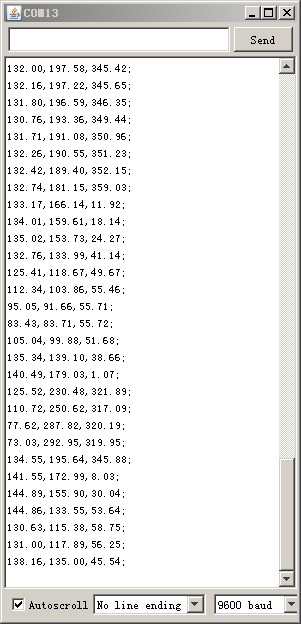
打开Arduino串口监视器即可看到结果(X平面角度,Y平面角度,Z平面角度):

分享到:  QQ好友和群QQ好友和群 QQ空间QQ空间 腾讯微博腾讯微博 腾讯朋友腾讯朋友
收藏收藏2 分享淘帖 顶 踩

相关帖子

回复

使用道具 举报

沙发
ID:114115 发表于 2016-4-14 02:54 | 只看该作者
最近实在太忙,就先单独把我的八字校准程序贴上来。
其实很简单,我没去管Z轴,如果想要更高的精度,需要加一个加速度传感器,我刚好没有。

我的整个校准分2个子函数:calibRead() 和 calibration()

参照官方HMC5883L的程序先把该定义的变量定义好。
  1.     HMC5883L digicomp;
  2.      
  3.     float X_max = 0.0;  //X轴最大读数
  4.     float X_min = 0.0;  //X轴最小读数
  5.      
  6.     float Y_max = 0.0;  //Y轴最大读数
  7.     float Y_min = 0.0;  //Y轴最小读数
  8.      
  9.     float X_offset = 0.0;  //X轴偏移
  10.     float Y_offset = 0.0;  //Y轴偏移
  11.      
  12.     void calibRead() //指南针读数
  13.     {
  14.             MagnetometerScaled scaled2 = digicomp.ReadScaledAxis();
  15.      
  16.             if (  (abs(scaled2.XAxis) < 500) && (abs(scaled2.YAxis) < 500) && (abs(scaled2.ZAxis) < 500)) //这行对于我很重要,能过滤掉很多干扰,增加校准的精度。
  17.             {  //下面几行就是读取到每个轴的最大值和最小值,然后算出相应的偏移量
  18.                 if(scaled2.XAxis > X_max) {X_max = scaled2.XAxis;}
  19.                 if(scaled2.YAxis > Y_max) {Y_max = scaled2.YAxis;}
  20.      
  21.                 if(scaled2.XAxis < X_min) {X_min = scaled2.XAxis;}
  22.                 if(scaled2.YAxis < Y_min) {Y_min = scaled2.YAxis;}
  23.      
  24.                 X_offset = (X_max + X_min) / 2.0;
  25.                 Y_offset = (Y_max + Y_min) / 2.0;
  26.             }
  27.     }
  28.      
  29.     void calibration()
  30.     {
  31.             int i = 0;
  32.             digitalWrite(motor1EnPin, 0);  // 定义转弯方向,对于我的小车来说是左转,逆时针方向
  33.             digitalWrite(motor2EnPin, 1);
  34.      
  35.             analogWrite(motor1, 80);  // 启动马达开始转动
  36.             analogWrite(motor2, 80);
  37.      
  38.             while(i < 1000)  // 逆时针方向循环读取XY轴每个方向的值,然后算出相应的偏移量
  39.             {  calibRead();
  40.                 delay(10);
  41.                 i++;
  42.             }
  43.      
  44.             i = 0;
  45.             digitalWrite(motor1EnPin, 1);  // 右转小车,顺时针方向
  46.             digitalWrite(motor2EnPin, 0);
  47.      
  48.             while(i < 1000)  // 再顺时针方向方向旋转测算偏移量
  49.             {  calibRead();
  50.                 delay(10);
  51.                 i++;
  52.             }
  53.      
  54.             analogWrite(motor1, 0);  // 停止小车,校准完成
  55.             analogWrite(motor2, 0);
  56.     }
  57.      
  58.     float readCompass()  //得到偏移了就可以读数了
  59.     {
  60.             MagnetometerScaled scaled = digicomp.ReadScaledAxis();
  61.      
  62.             float heading = atan2(scaled.YAxis - Y_offset, scaled.XAxis - X_offset);  // 读数的时候直接减掉偏移量就可以了
  63.      
  64.             //float declinationAngle = 36.36/1000.0;  [这几行是考虑磁偏角的,除非真的是想
  65.             //heading = heading + declinationAngle;    找地理北极,不然对方向判断用处不大]
  66.      
  67.             if(heading < 0)  heading += 2*PI;
  68.             if(heading > 2*PI)  heading -= 2*PI;
  69.      
  70.             float headingDegrees = heading * 180/M_PI;
  71.      
  72.             return headingDegrees;
  73.     }
复制代码

严格来说这个传感器读出来的仅仅是三轴方向磁场强度而已,角度是算出来的。另外他对磁场感应很灵敏,周围有金属就会有干扰,拿块金属在他周围转转就能看到读数很大的变化,所以校准还是很有必要的。

手机的话因为画8字能很快测得XY的偏移,所以方法就叫8字校准。小车的话因为可以旋转,就没必要真的去走8字,直接转圈就可以了。这是我的理解。
回复

使用道具 举报

板凳
ID:114115 发表于 2016-4-14 02:54 | 只看该作者
上传一个HMC5883L库文件,放在C:\Program Files (x86)\Arduino\libraries就可运行,ARDUINO 1.0.6版本的三轴传感器。代码详见1楼。

    HMC5883L新头文件: HMC5883L.rar (5.14 KB, 下载次数: 41)
回复

使用道具 举报

地板
ID:114115 发表于 2016-4-14 02:55 | 只看该作者
焊接还是很简单的,个人玩买个可调温和恒温的电烙铁,最好60W的,升温快,焊接前先将烙铁头附锡(其实一般新电烙铁都需要先附锡,每次用完也要附锡防氧化),面板焊接点注意刷好助焊剂(可以用松香+酒精自己调,酒精要纯度高的工业酒精大概酒精和松香1:0.2就差不多了,然后刷到要焊接的引脚和PCB板上),最后直接焊锡丝点烙铁头刷引脚(不要担心连线,先让焊锡全部下到引脚上,最后拿烙铁刷一边,焊锡会自己焊接到点,最好让板子稍微倾斜,自上而下刷,这样多余的锡会流到最下边,然后拿烙铁点掉就好了),最后用酒精棉擦洗焊点(将多余助焊剂洗掉),检查焊点是否有连接,如果不确定用镊子刮一刮就好了。(烙铁使用要快点快提,这样锡会自己成非常漂亮的形状,不要长时间点焊点)

PCB板是不会附着焊锡的,所以不用担心焊不好,其实很简单,关键烙铁要好,个人用我觉得黄花907调温恒温烙铁就好,淘宝上很便宜,反正我自己用的就很不错。。。。

最后,烙铁头要多买几个不同样式的,以应对不同焊点。。

------------------------

另,最近发现一个HMC5883的问题,一并记这儿:最近买了几片HMC5883L模块,结果被坑了,卖家没说不能用在5V系统,只说能5V供电,以为在MEGA2560上能用,结果读数据有问题,一开始是读出来不更新,每次复位更新一次数据,后来发现上拉电阻不是装的PCB上印的4.7K,装的是10K,换成4.7K后,可以连续读数据,但读一断时间后就会死机,以为程序有问题,查来查去,后来发现以前买的模块能正常读,仔细比较两个模块,发现新买的模块没有电平转换电路,以HMC5883L的IIc的1.8V电平直接接5V系统,不死才怪,所以5V系统买这个模块一定要买GY-271型号,有两个小6脚芯片的,一个是LDO,一个是双MOS做电平转换,只有一个LDO的模块只能用在3.3V或1.8V系统。
回复

使用道具 举报

5#
ID:148138 发表于 2016-11-15 21:32 | 只看该作者
5893也出来了
回复

使用道具 举报

6#
ID:165193 发表于 2017-2-18 00:07 | 只看该作者
回复有黑币吗
回复

使用道具 举报

7#
ID:24730 发表于 2017-3-2 16:50 | 只看该作者
51黑有你更精彩
回复

使用道具 举报

8#
ID:1 发表于 2017-3-2 17:06 | 只看该作者

回复是没有的 只能通过发布文件 管理员审核通过后 才会发放
回复

使用道具 举报

9#
ID:230088 发表于 2017-8-31 16:24 | 只看该作者
回复有黑币么?
回复

使用道具 举报

10#
ID:326549 发表于 2019-5-30 15:51 | 只看该作者
fatal error: ../Wire/Wire.h: No such file or directory #include "../Wire/Wir
请问这是怎么回事
回复

使用道具 举报

11#
ID:514567 发表于 2019-6-7 12:00 | 只看该作者
很厉害
回复

使用道具 举报

您需要登录后才可以回帖 登录 | 立即注册

本版积分规则

小黑屋|51黑电子论坛 |51黑电子论坛6群 QQ 管理员QQ:125739409;技术交流QQ群281945664

Powered by 单片机教程网

快速回复 返回顶部 返回列表